
Contributor post written by Candice Smith
When we decided to become chicken owners, a few concerns came to mind: where to find chickens, how to feed and provide for them, and how to shelter them. And like anyone else we started enthusiastically looking at brand new freshly painted hen houses.
Have ya seen how much they cost?
I longed for the four thousand dollar fancy one. You know, the one that’s barnyard red with white trim. The port hole window with etched glass of a rooster. The one with curtains and a chandelier. The automatic door that opened to a white picket fenced run. Oh, who was I kidding? I also wanted the matching red and white mansion for us, but that’s just not in the cards.
So, I moved on to my next best idea for housing, online blue prints. Yes it’s true. There are thousands of free online blue prints offered for any style and price point. Even as low as eighty dollars.
I decided to make my own. It does take someone who knows their way with a saw and the right materials, it can easily be done and done well! So that’s what we did. I picked my inspiration. A picture of a coop I wanted to emulate.
We have four laying pullets soon to get their title “hen”, once they turn a year, and I wanted them to enjoy their home. You want to make sure you choose a coop that is appropriately sized and adequate enough to house your hens comfortably. That means enough space. About two to four square feet per hen. It also needs to be warm enough for cold winters and cool enough for hot summers. Ventilation is very important.
My husband and I chose to take a weekend and build our own. Our budget was about one hundred fifty dollars for supplies, but we only ended up spending around thirty dollars. Can you believe it? No lie! You’d be amazed if you looked around your home as well, at what you can use and what is lying around just waiting for a DIY (Do It Yourself) project.
When we looked around we found lumber, screws, nails, liquid nail, hardware, paint, even shingles. Everything we needed to get started. I sat down and drew up my plans. Ok, they weren’t plans more like a square with lines that ended up looking like a preschool picture, but my wonderful husband did an amazing job deciphering my drawing.
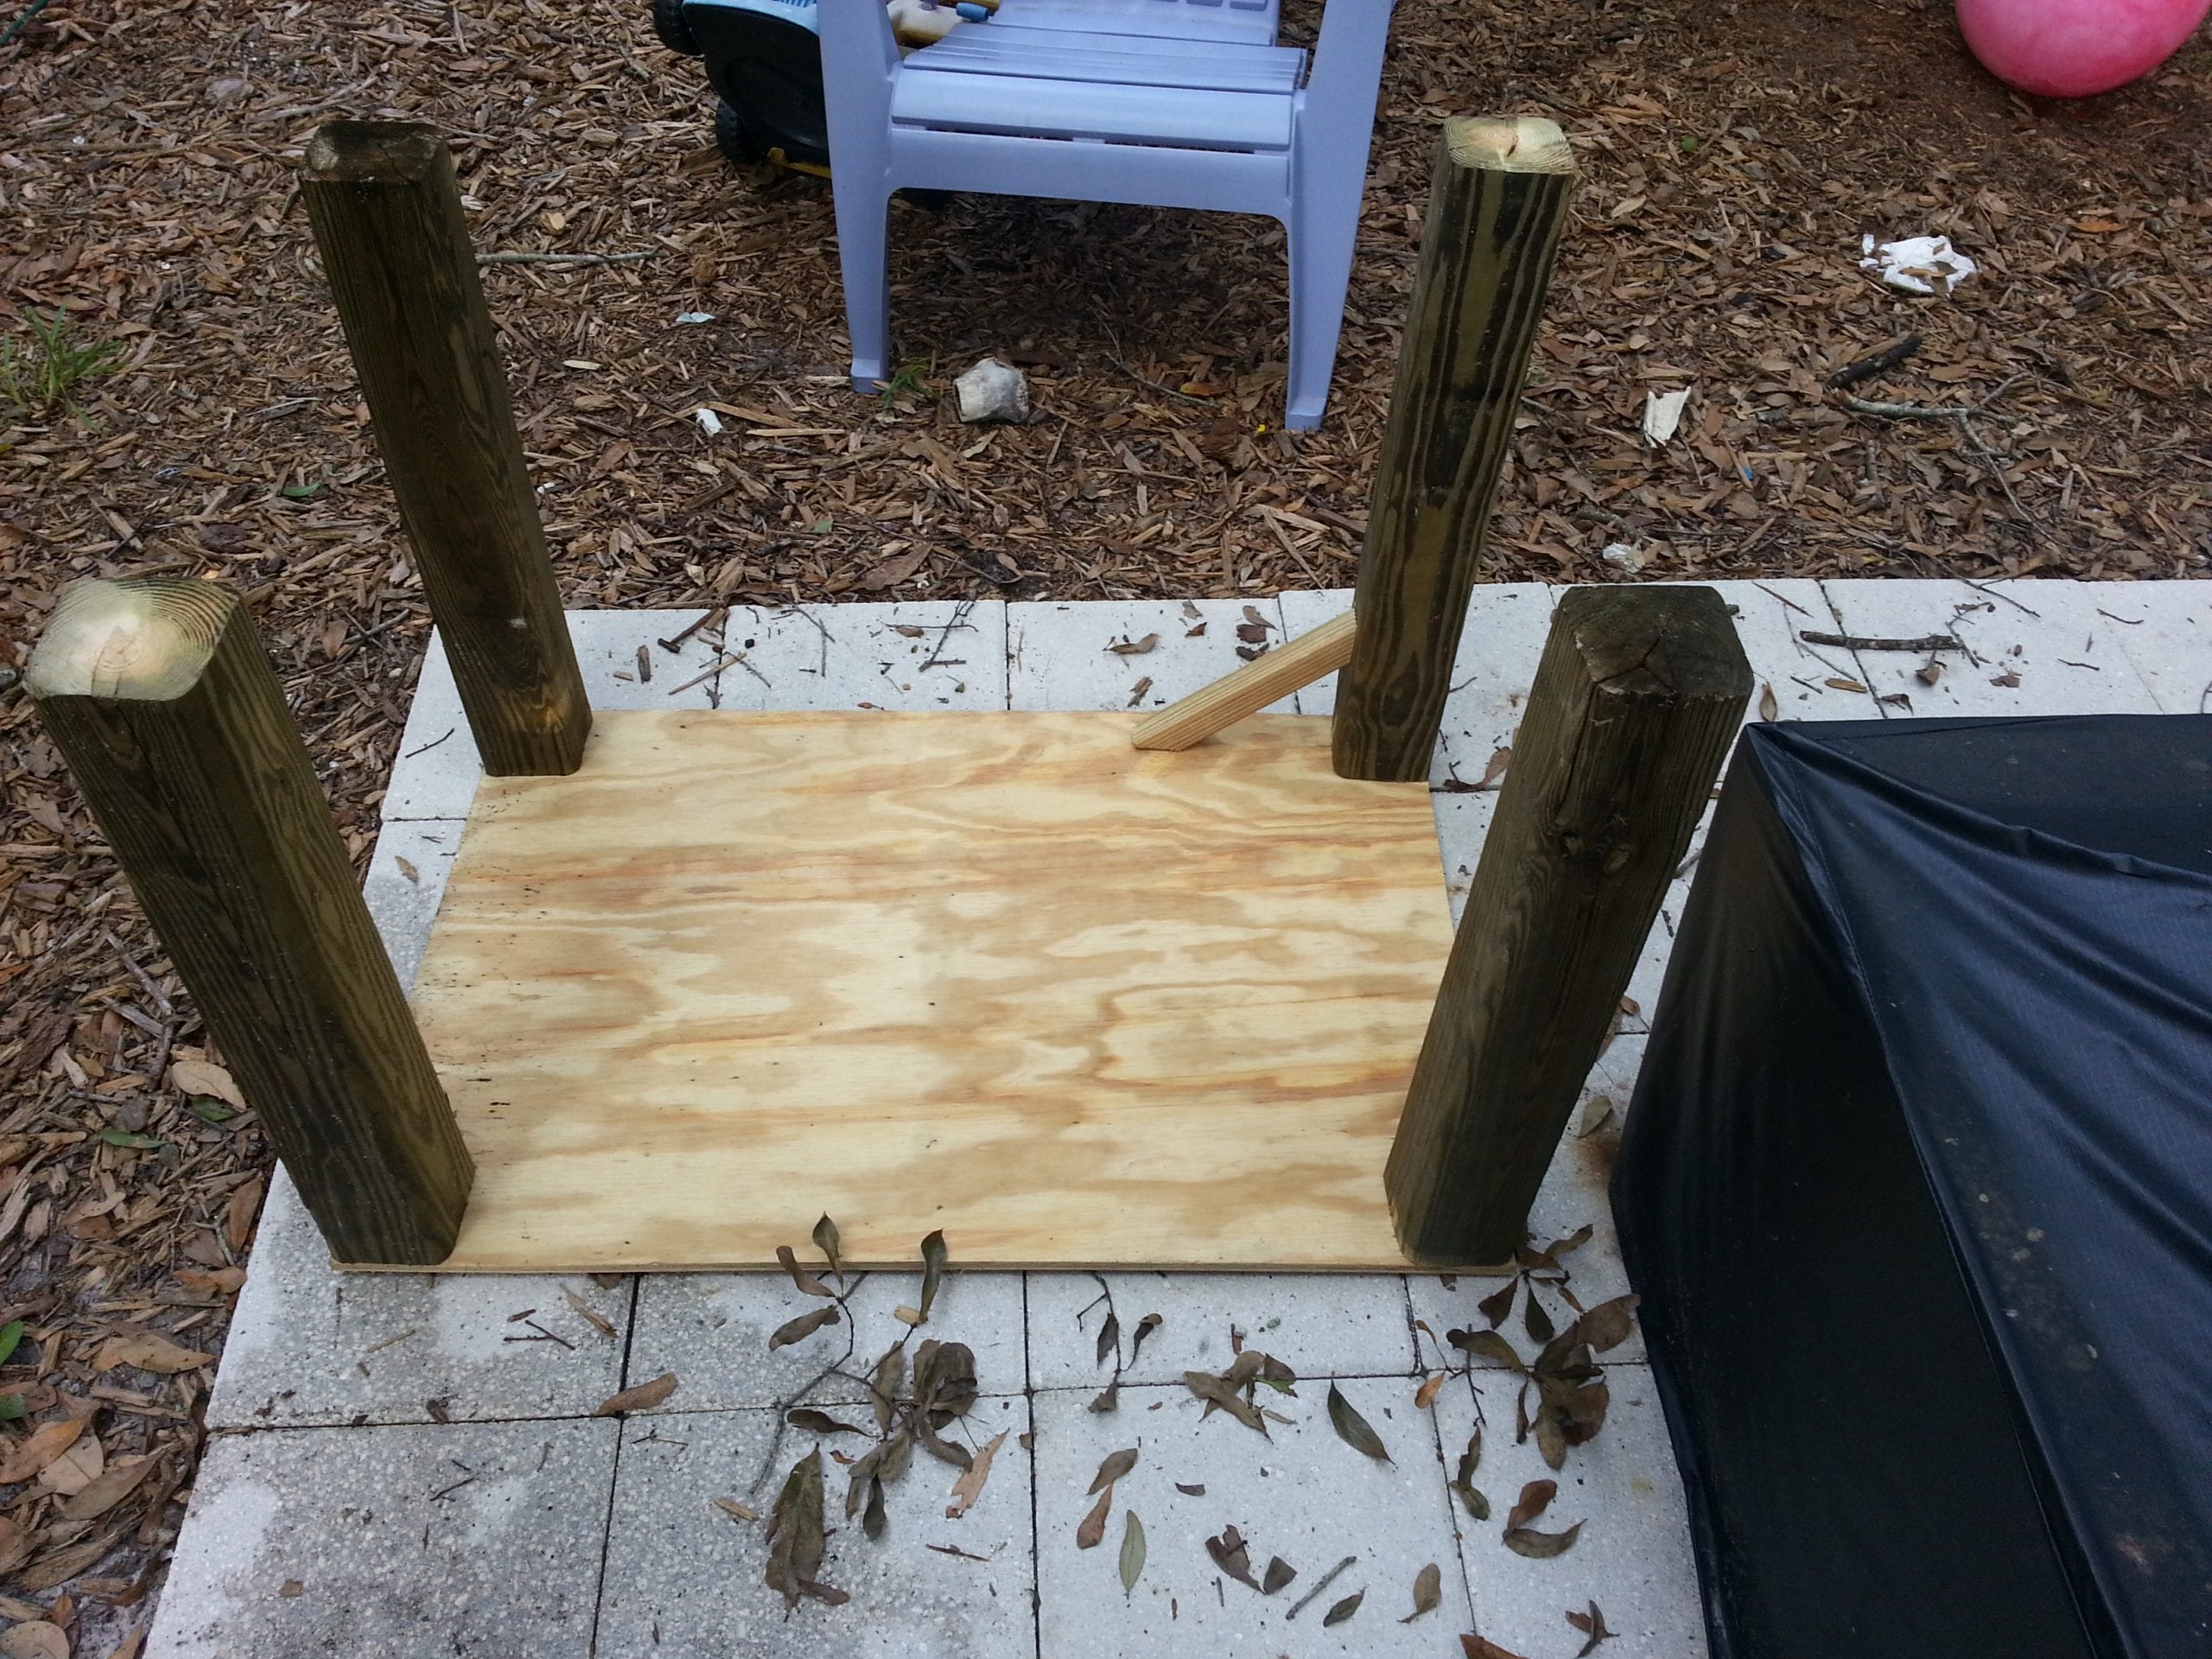
Folks, I give you the coop base. Where it all started. I had run to the hardware store for some staples and on my way back a huge pile of “rubble” caught my eye on the side of the road. Someone had decided to throw away their dated yellow 1960’s kitchen cabinets. I searched through the pile and spotted the one I wanted. A sturdy kitchen cabinet that was to become my nesting box area and egg retrieval. Did I mention they were free?
I came home and proudly announced my find. My husband was pretty impressed. I started by taking the backside off and scrubbing it down. Once it was attached to the base my husband added a few outer walls.
It turned into this.
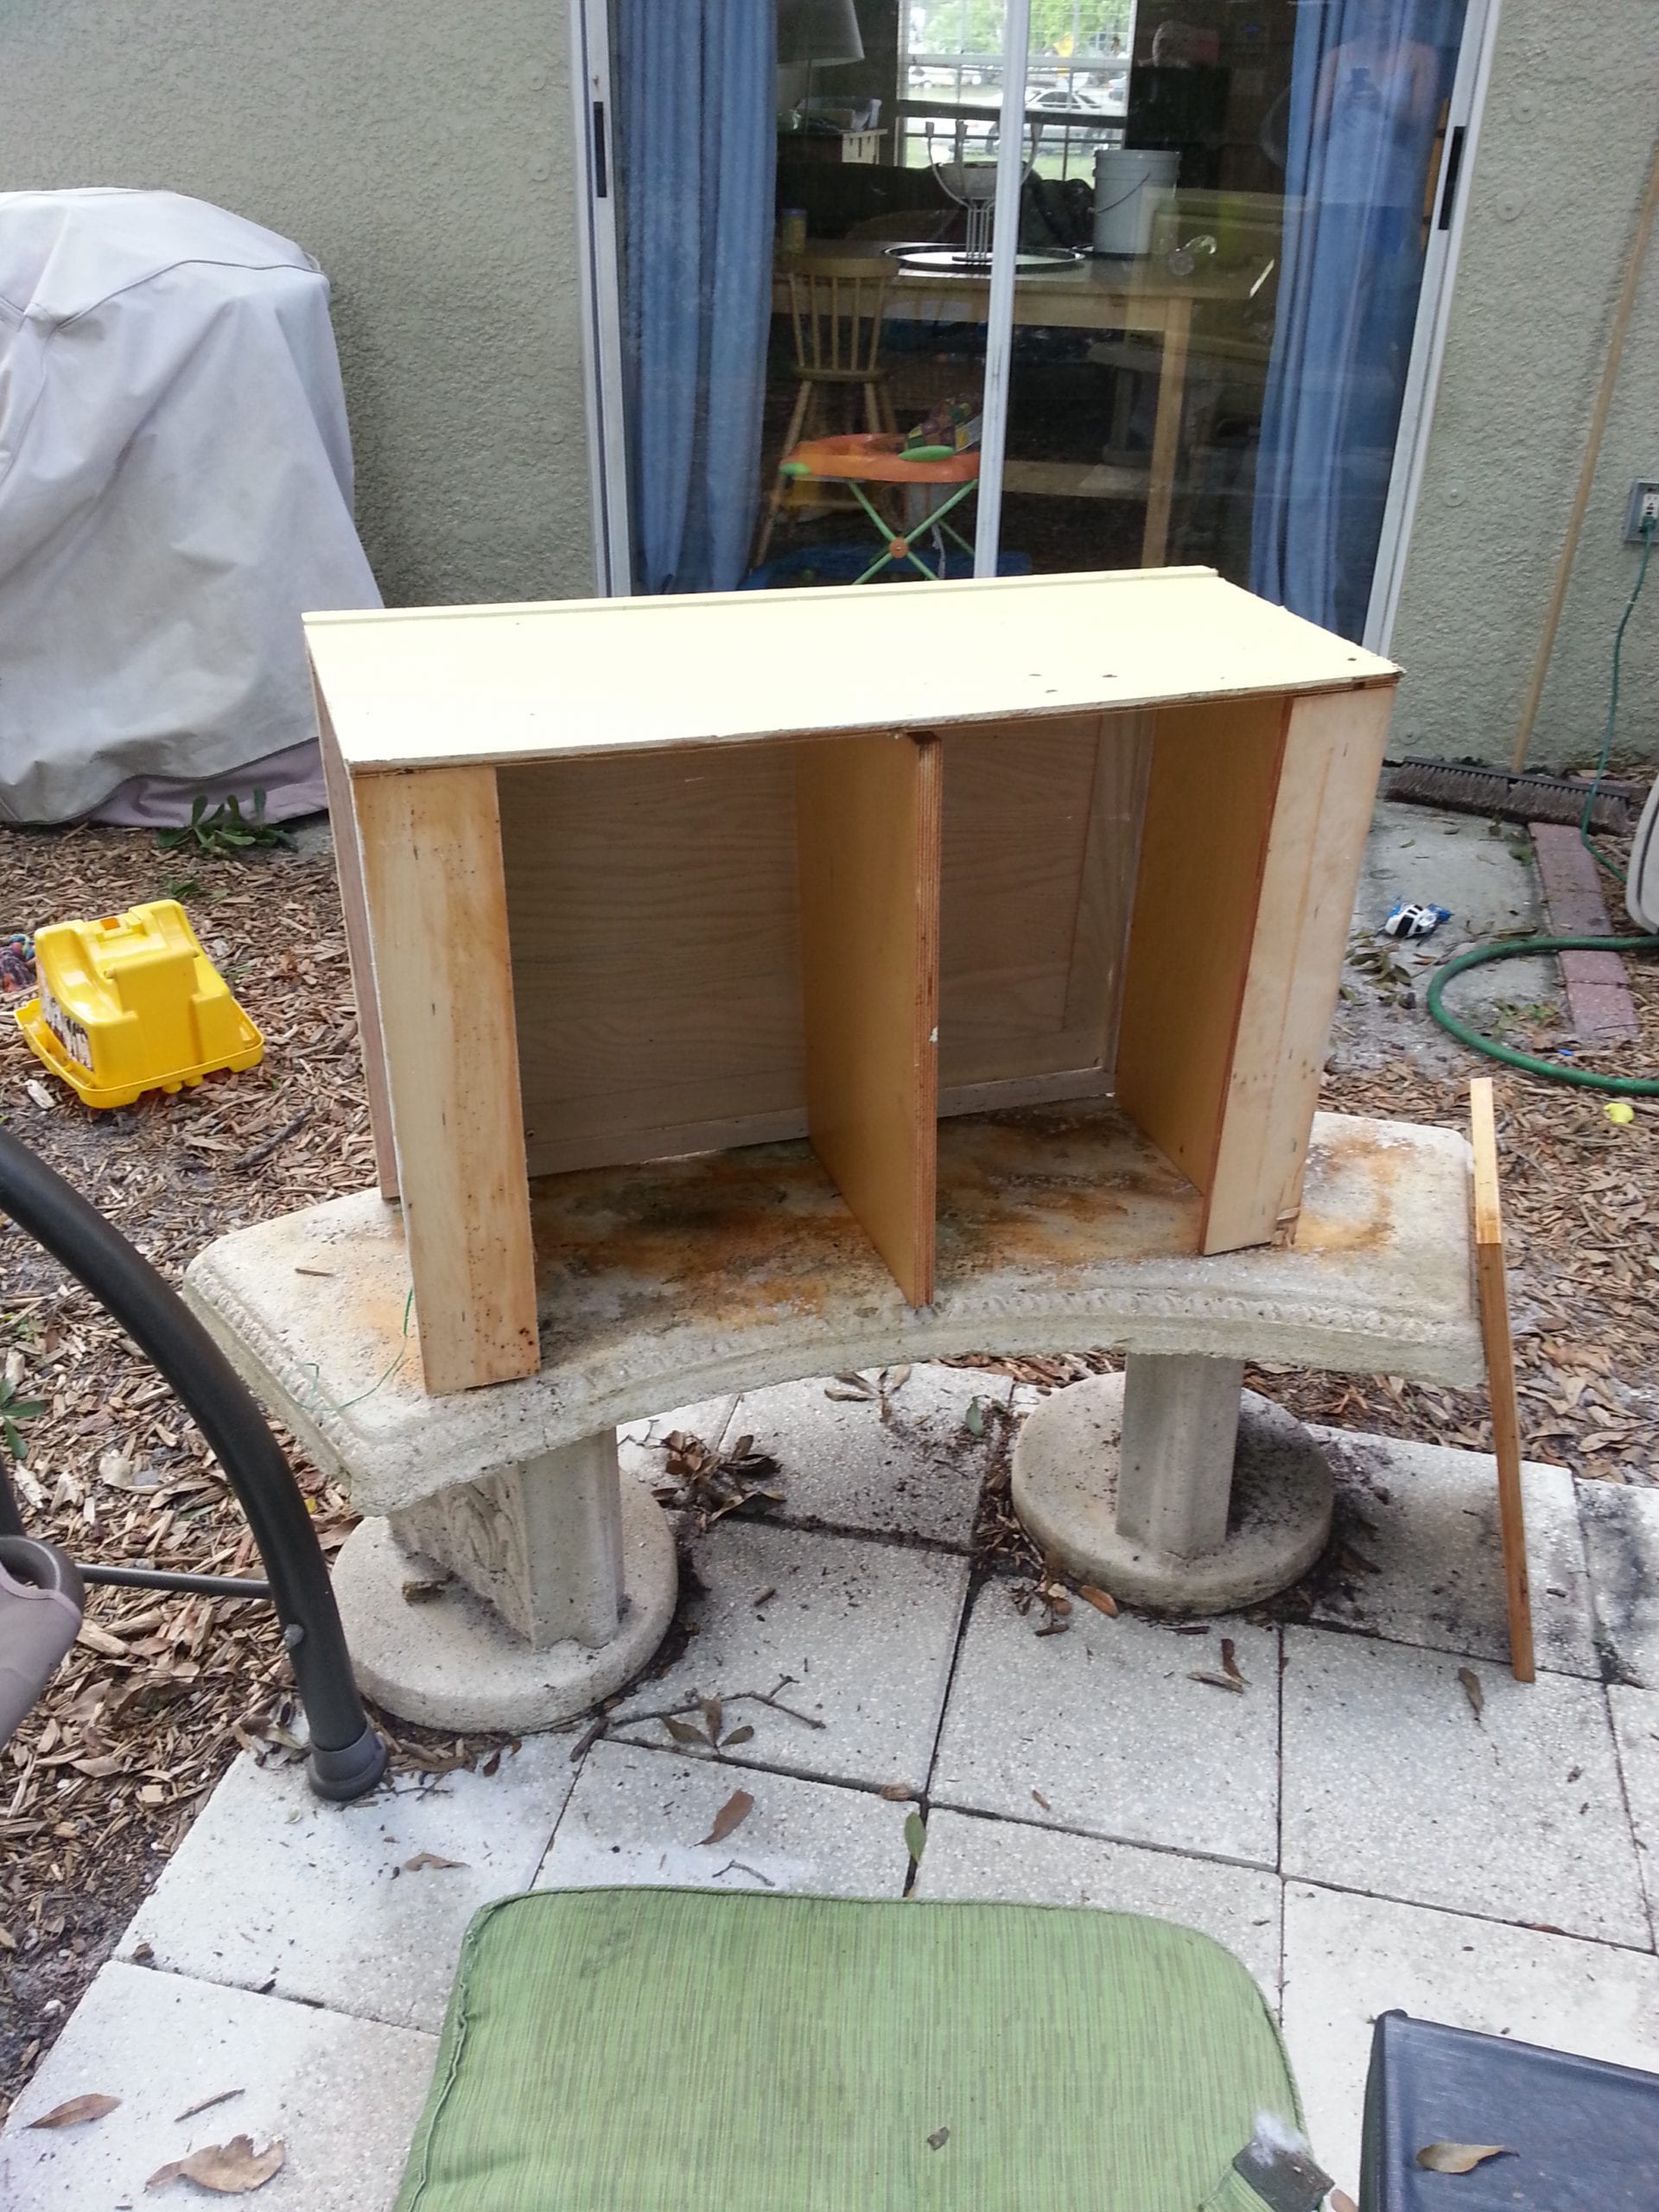
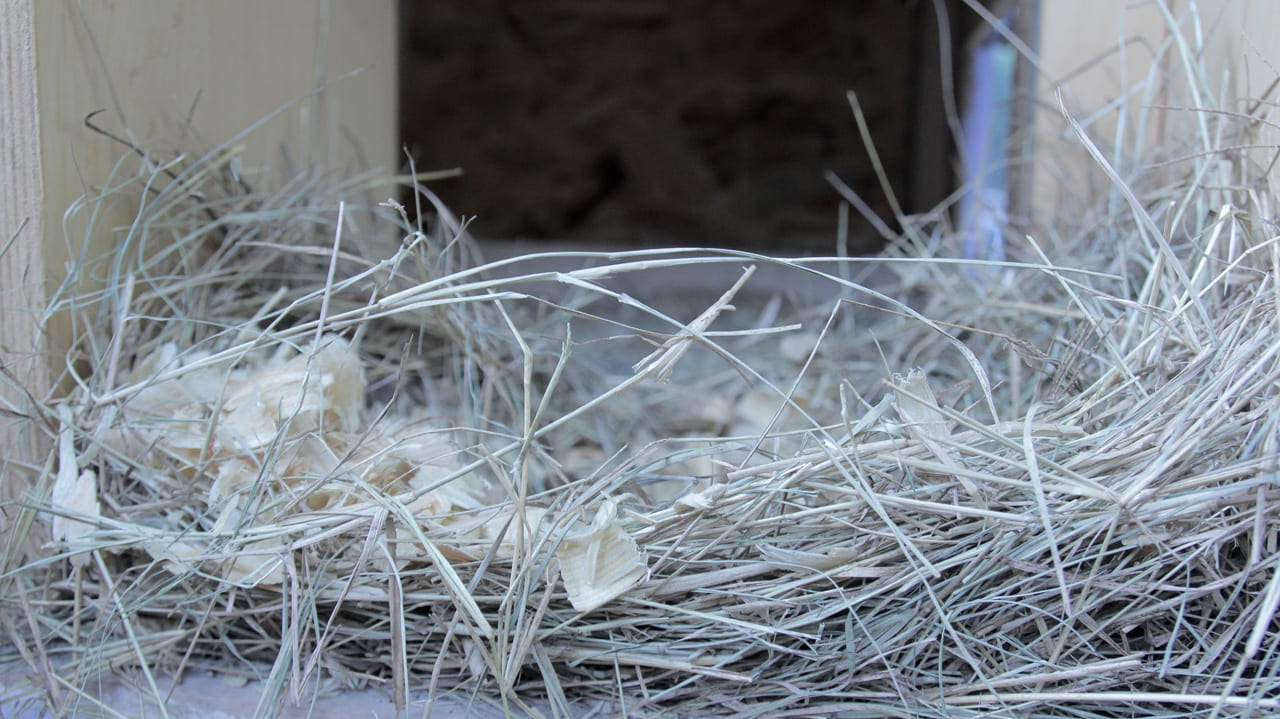
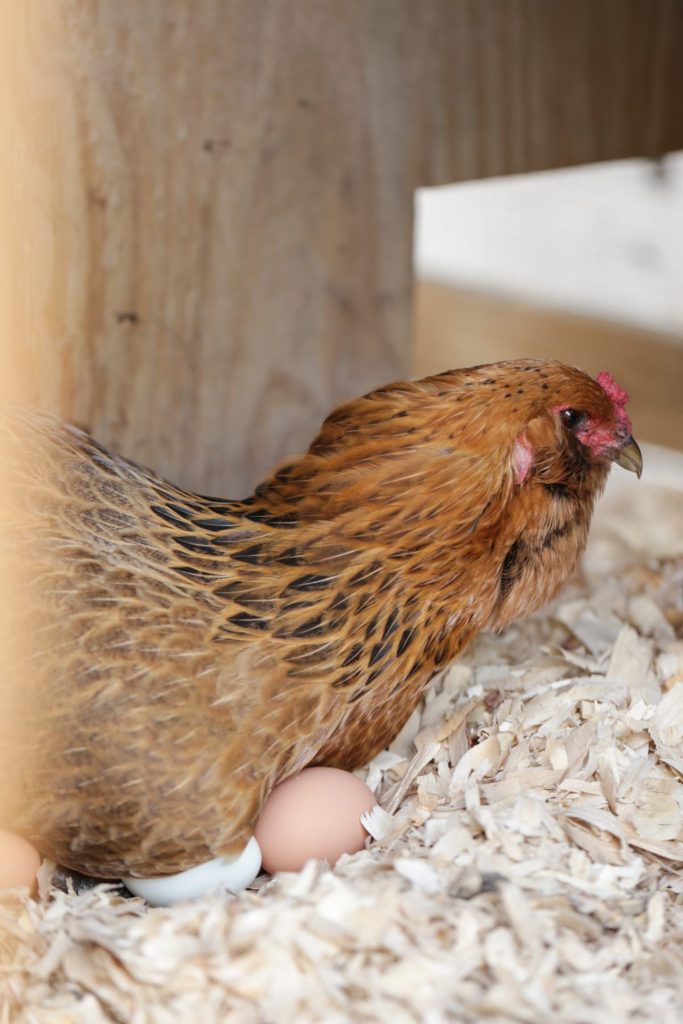
Next, we decided we needed not just one, but two nesting areas. It’s important to have one nesting box per three hens. Though they don’t mind sharing, you don’t want over crowded boxes because it makes for fussy girls. I offered two nesting boxes enough for 6 hens and my girls still insist on using just one. I also offer hay and shavings in these areas making a nice cozy dark area they feel comfortable laying their perfect little eggs.
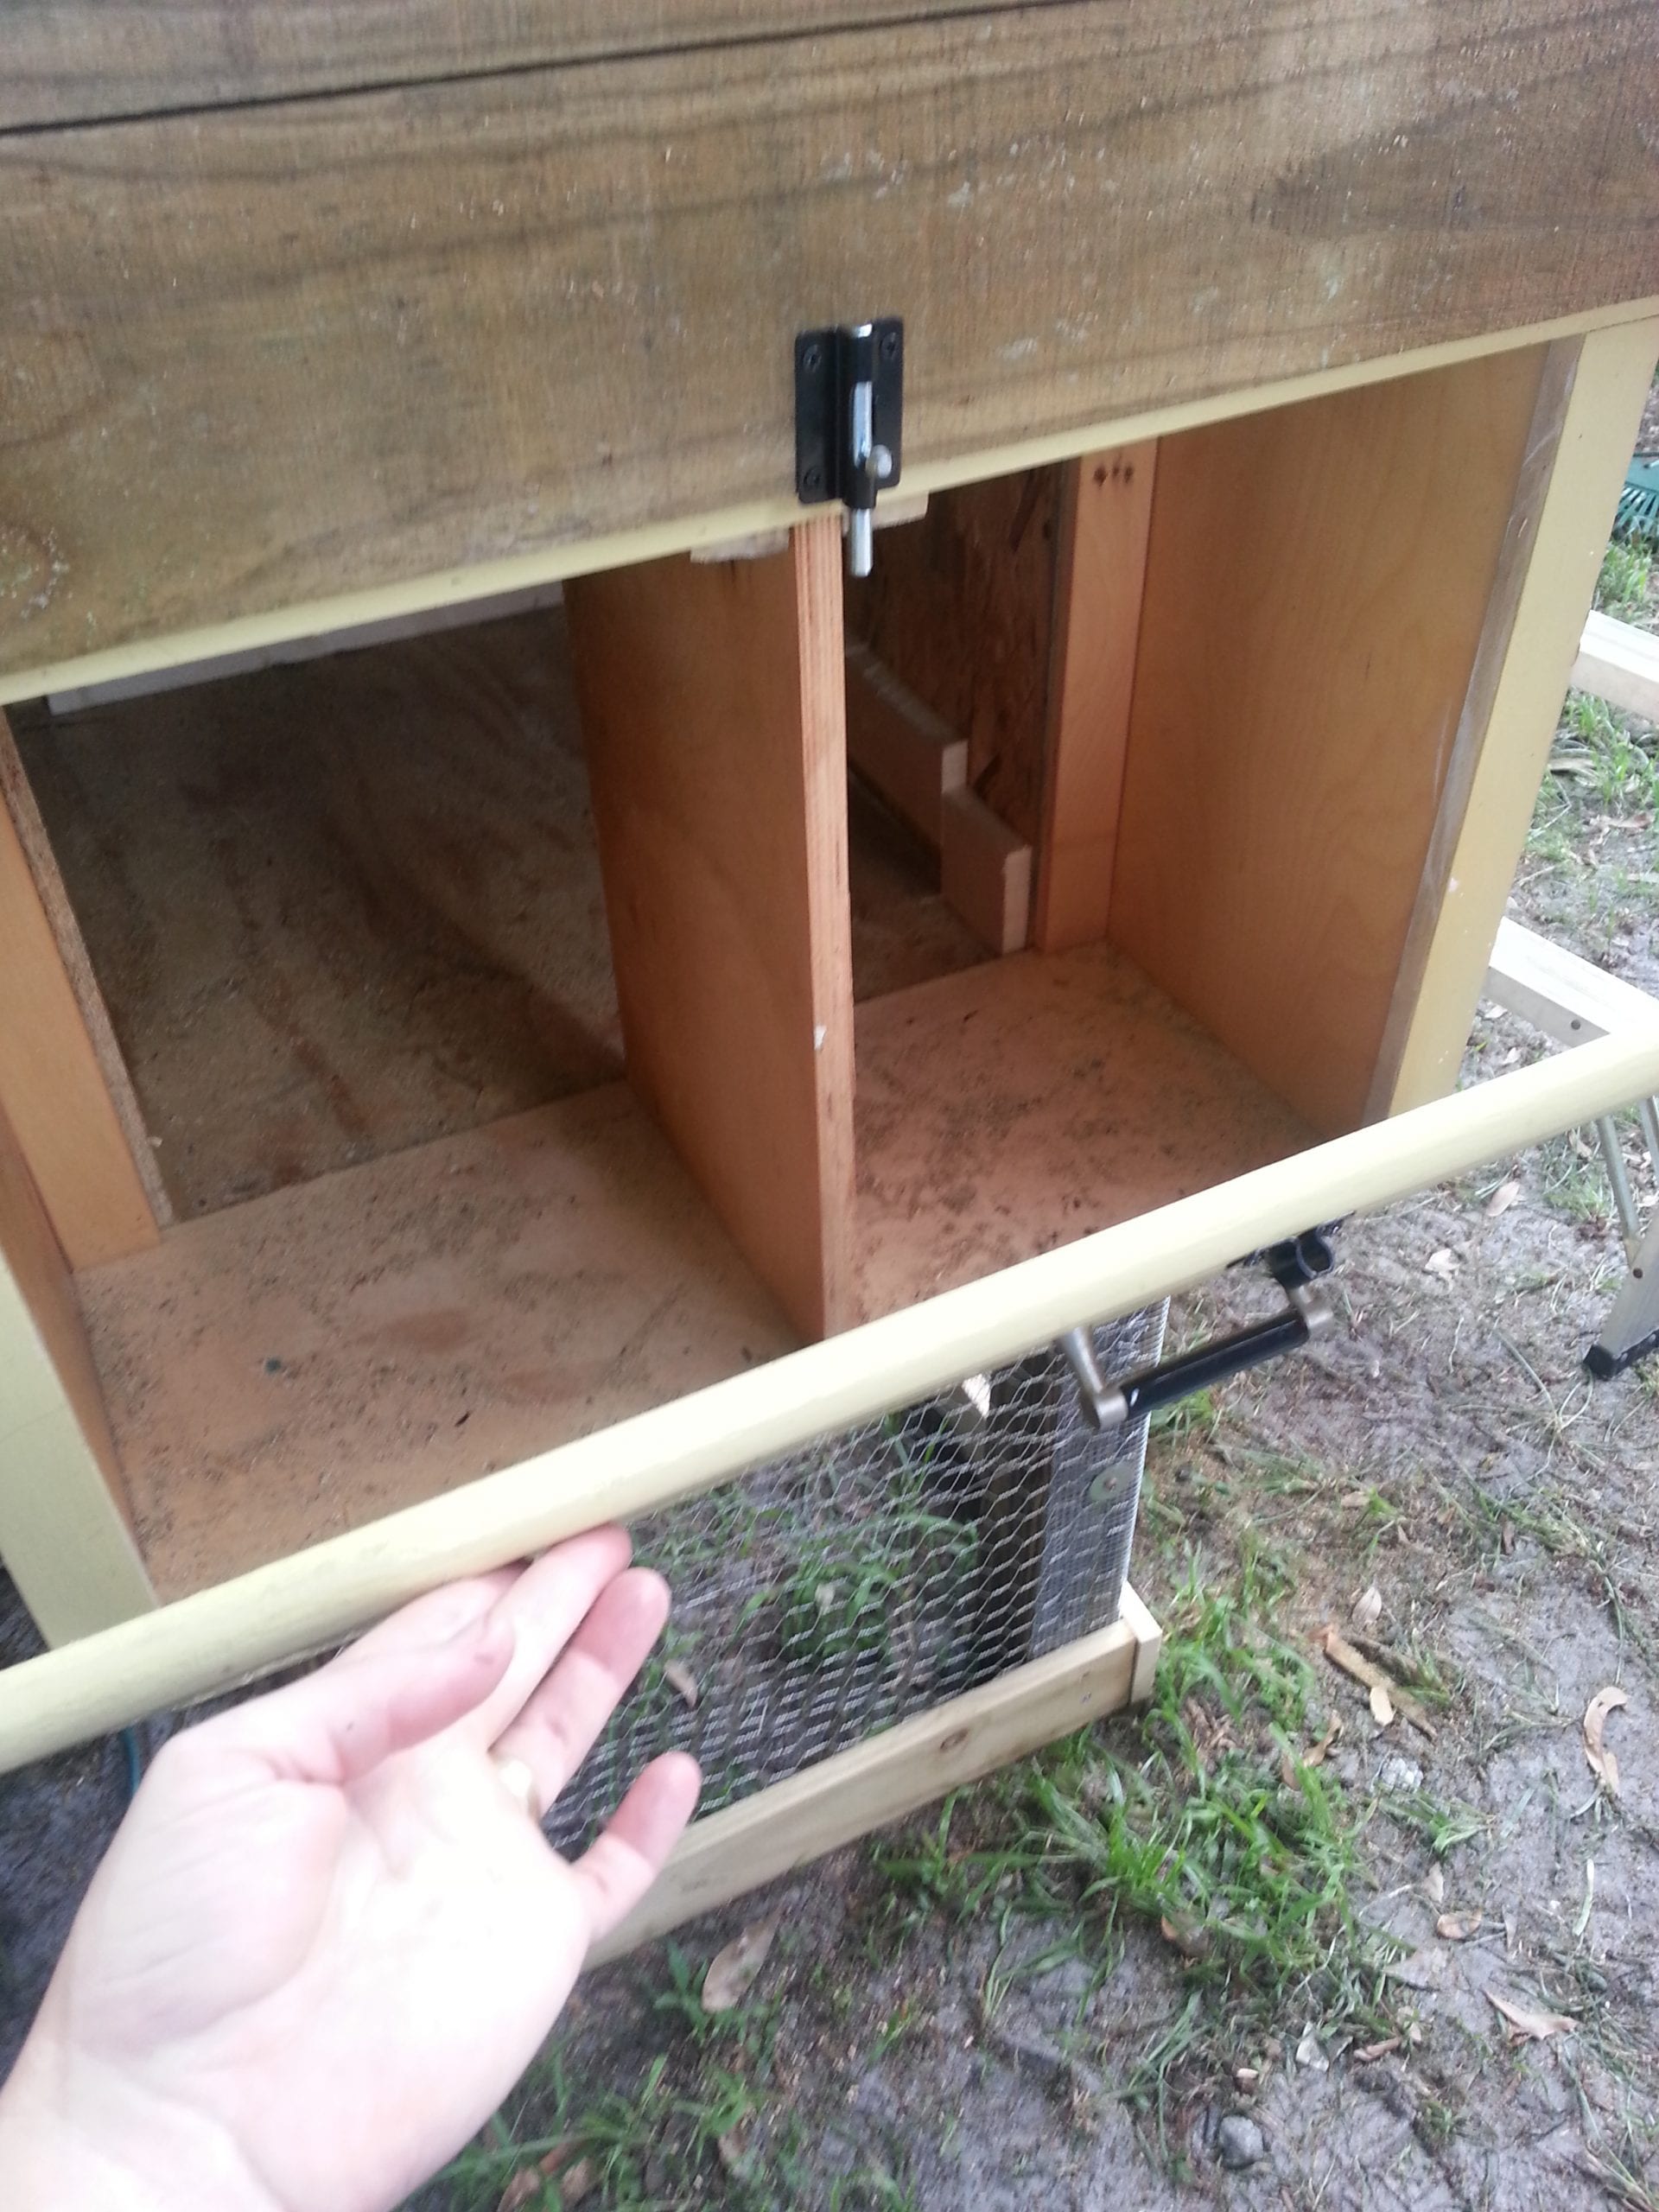
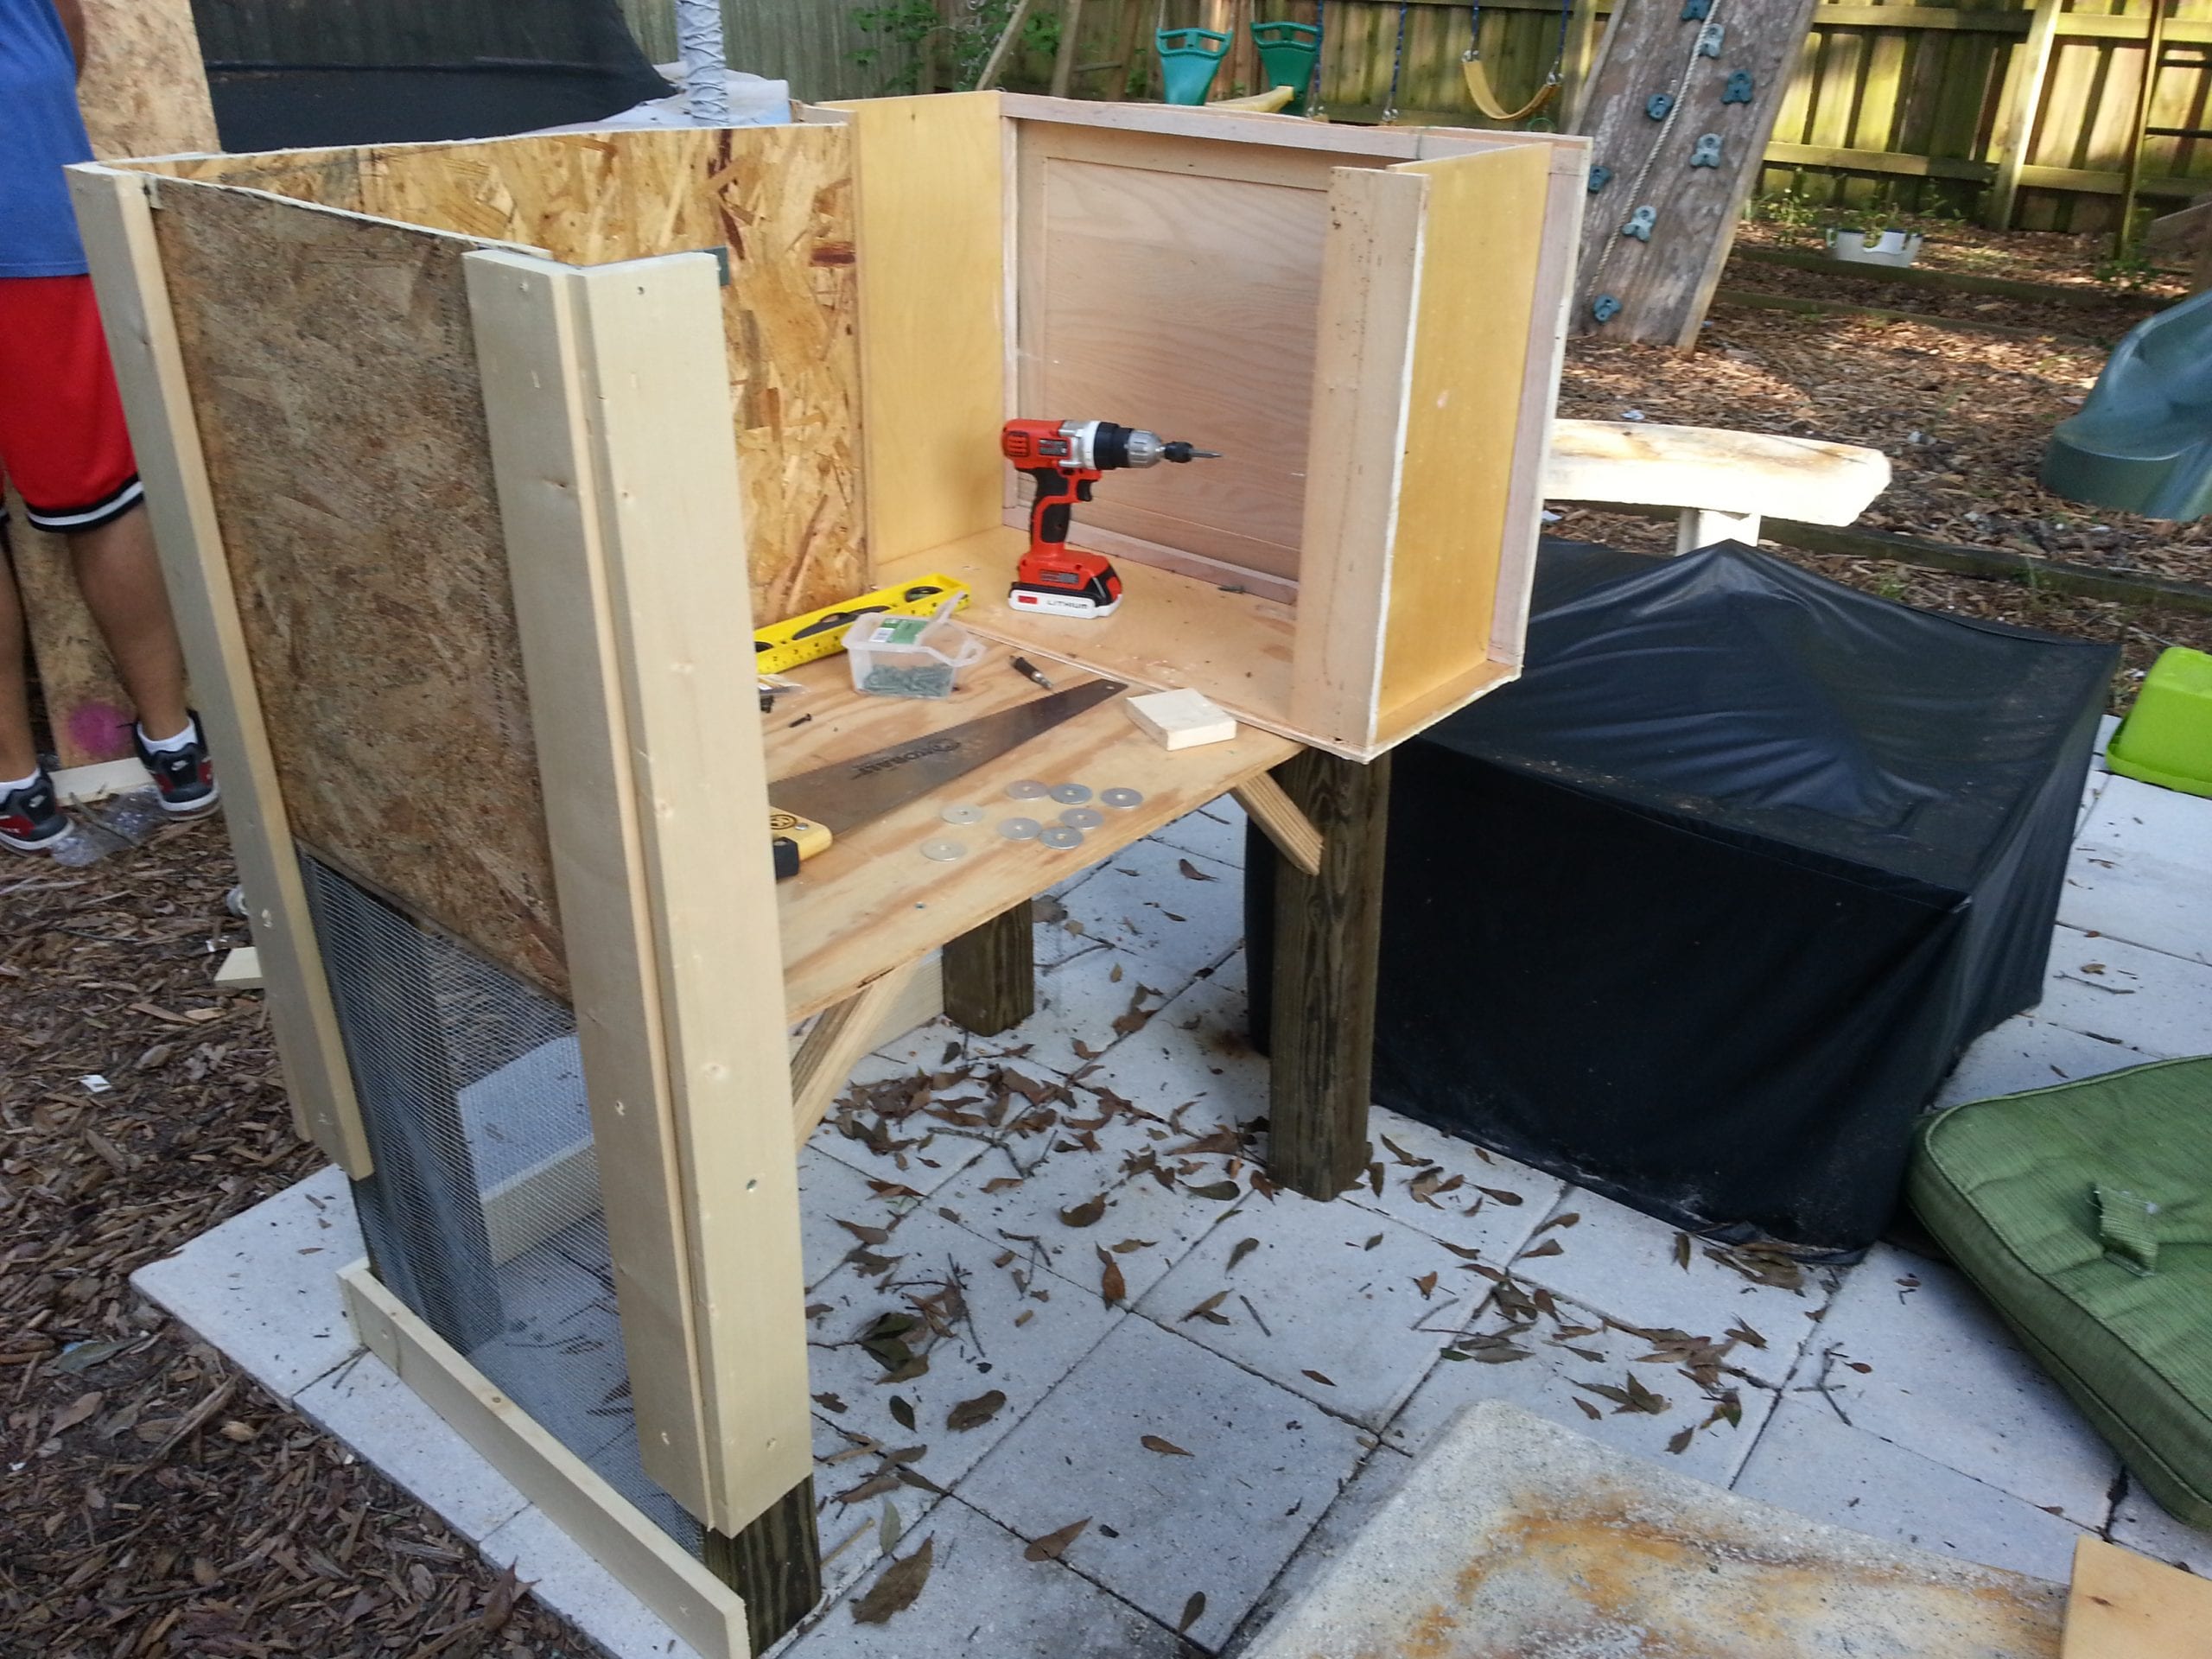
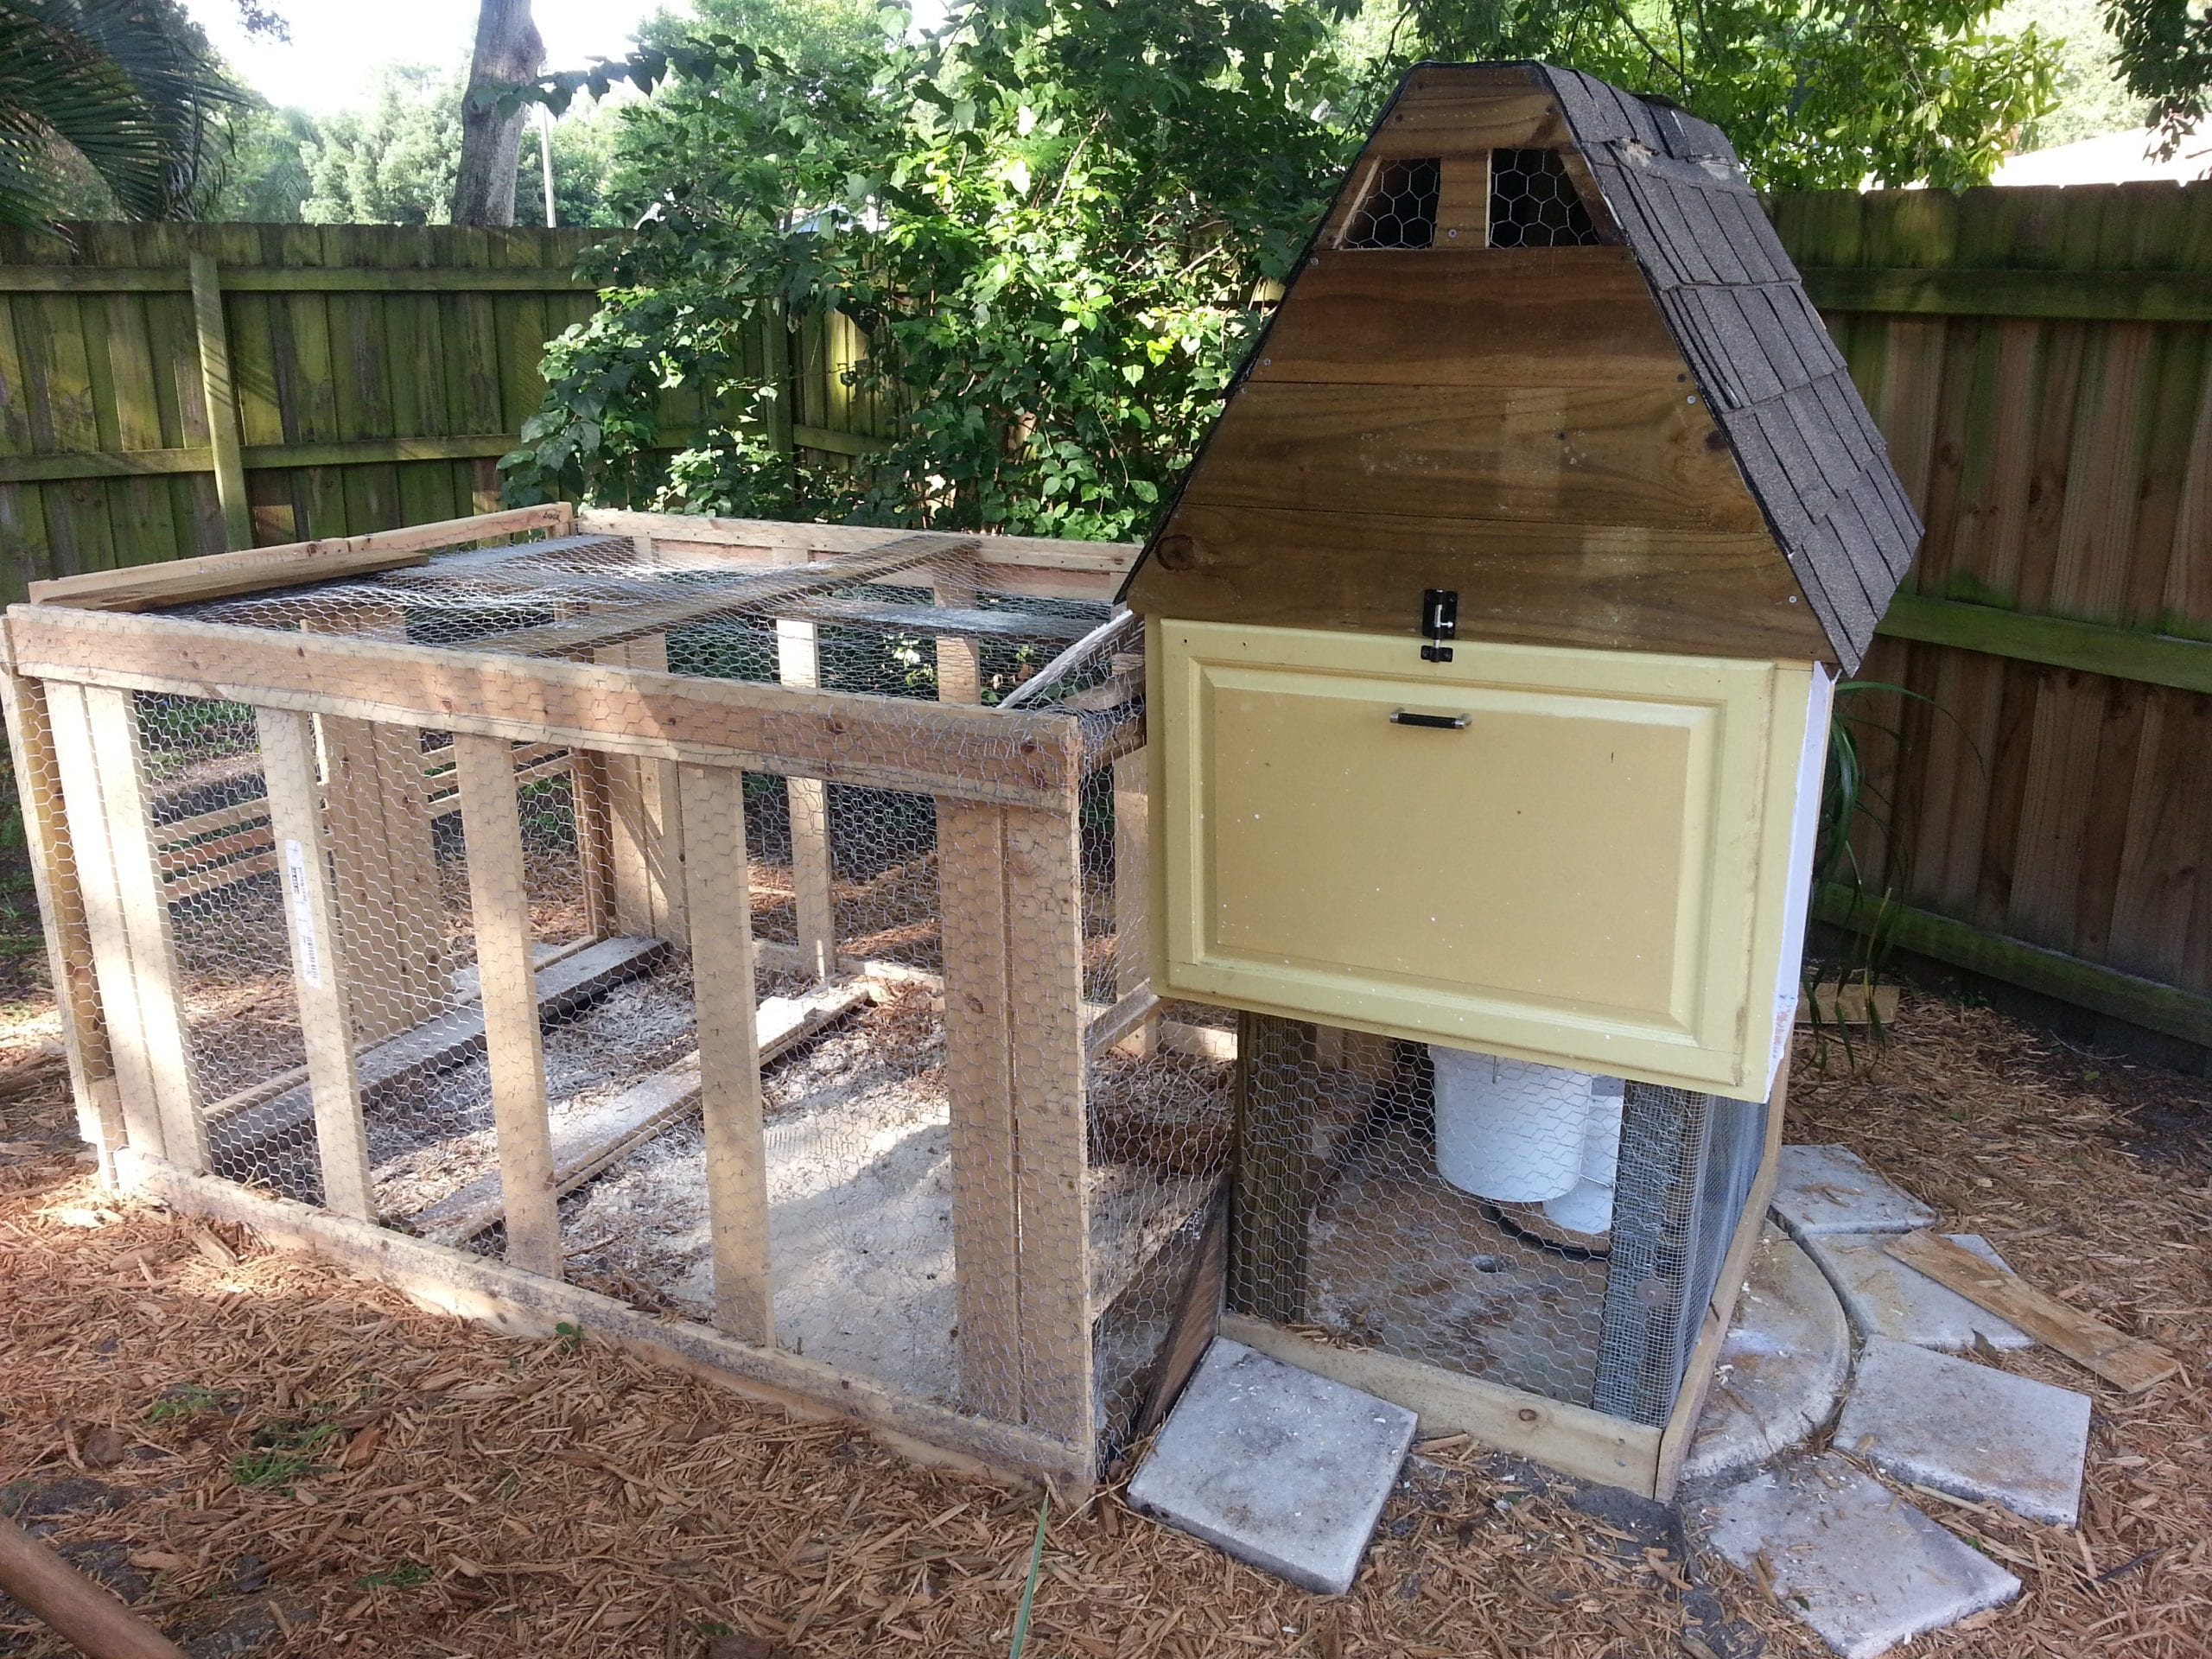
Next, we added chicken wire to the bottom, cut out doors and put hinges on them. One door to get eggs, one door on the opposite side for cleaning, and one sliding door for them to come in and out of the run. Three doors total. We used Plywood we had leftover from our hurricane window coverings and leftover fencing for extra protection. That’s double insulating protection. We used a hand saw, a jig saw, and basic hand tools like an automatic screw driver, a hammer, and a staple gun to achieve the cuts we needed to make.
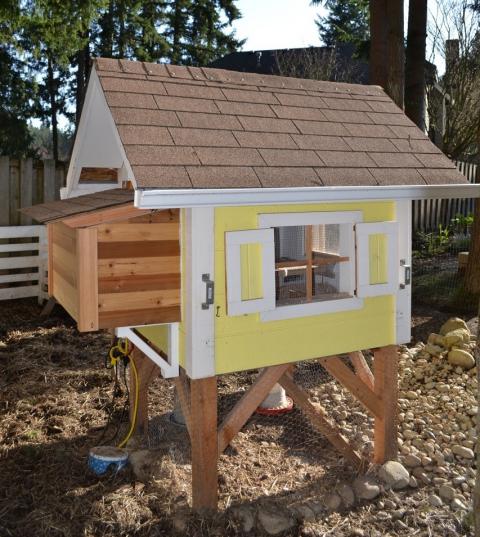
Many people choose to have their coops close to the ground, but we chose the elevated coop. We felt this aided in the most protection from predators as well as moisture from the ground and also created a lower space that is shaded for them to gather and stay cool.
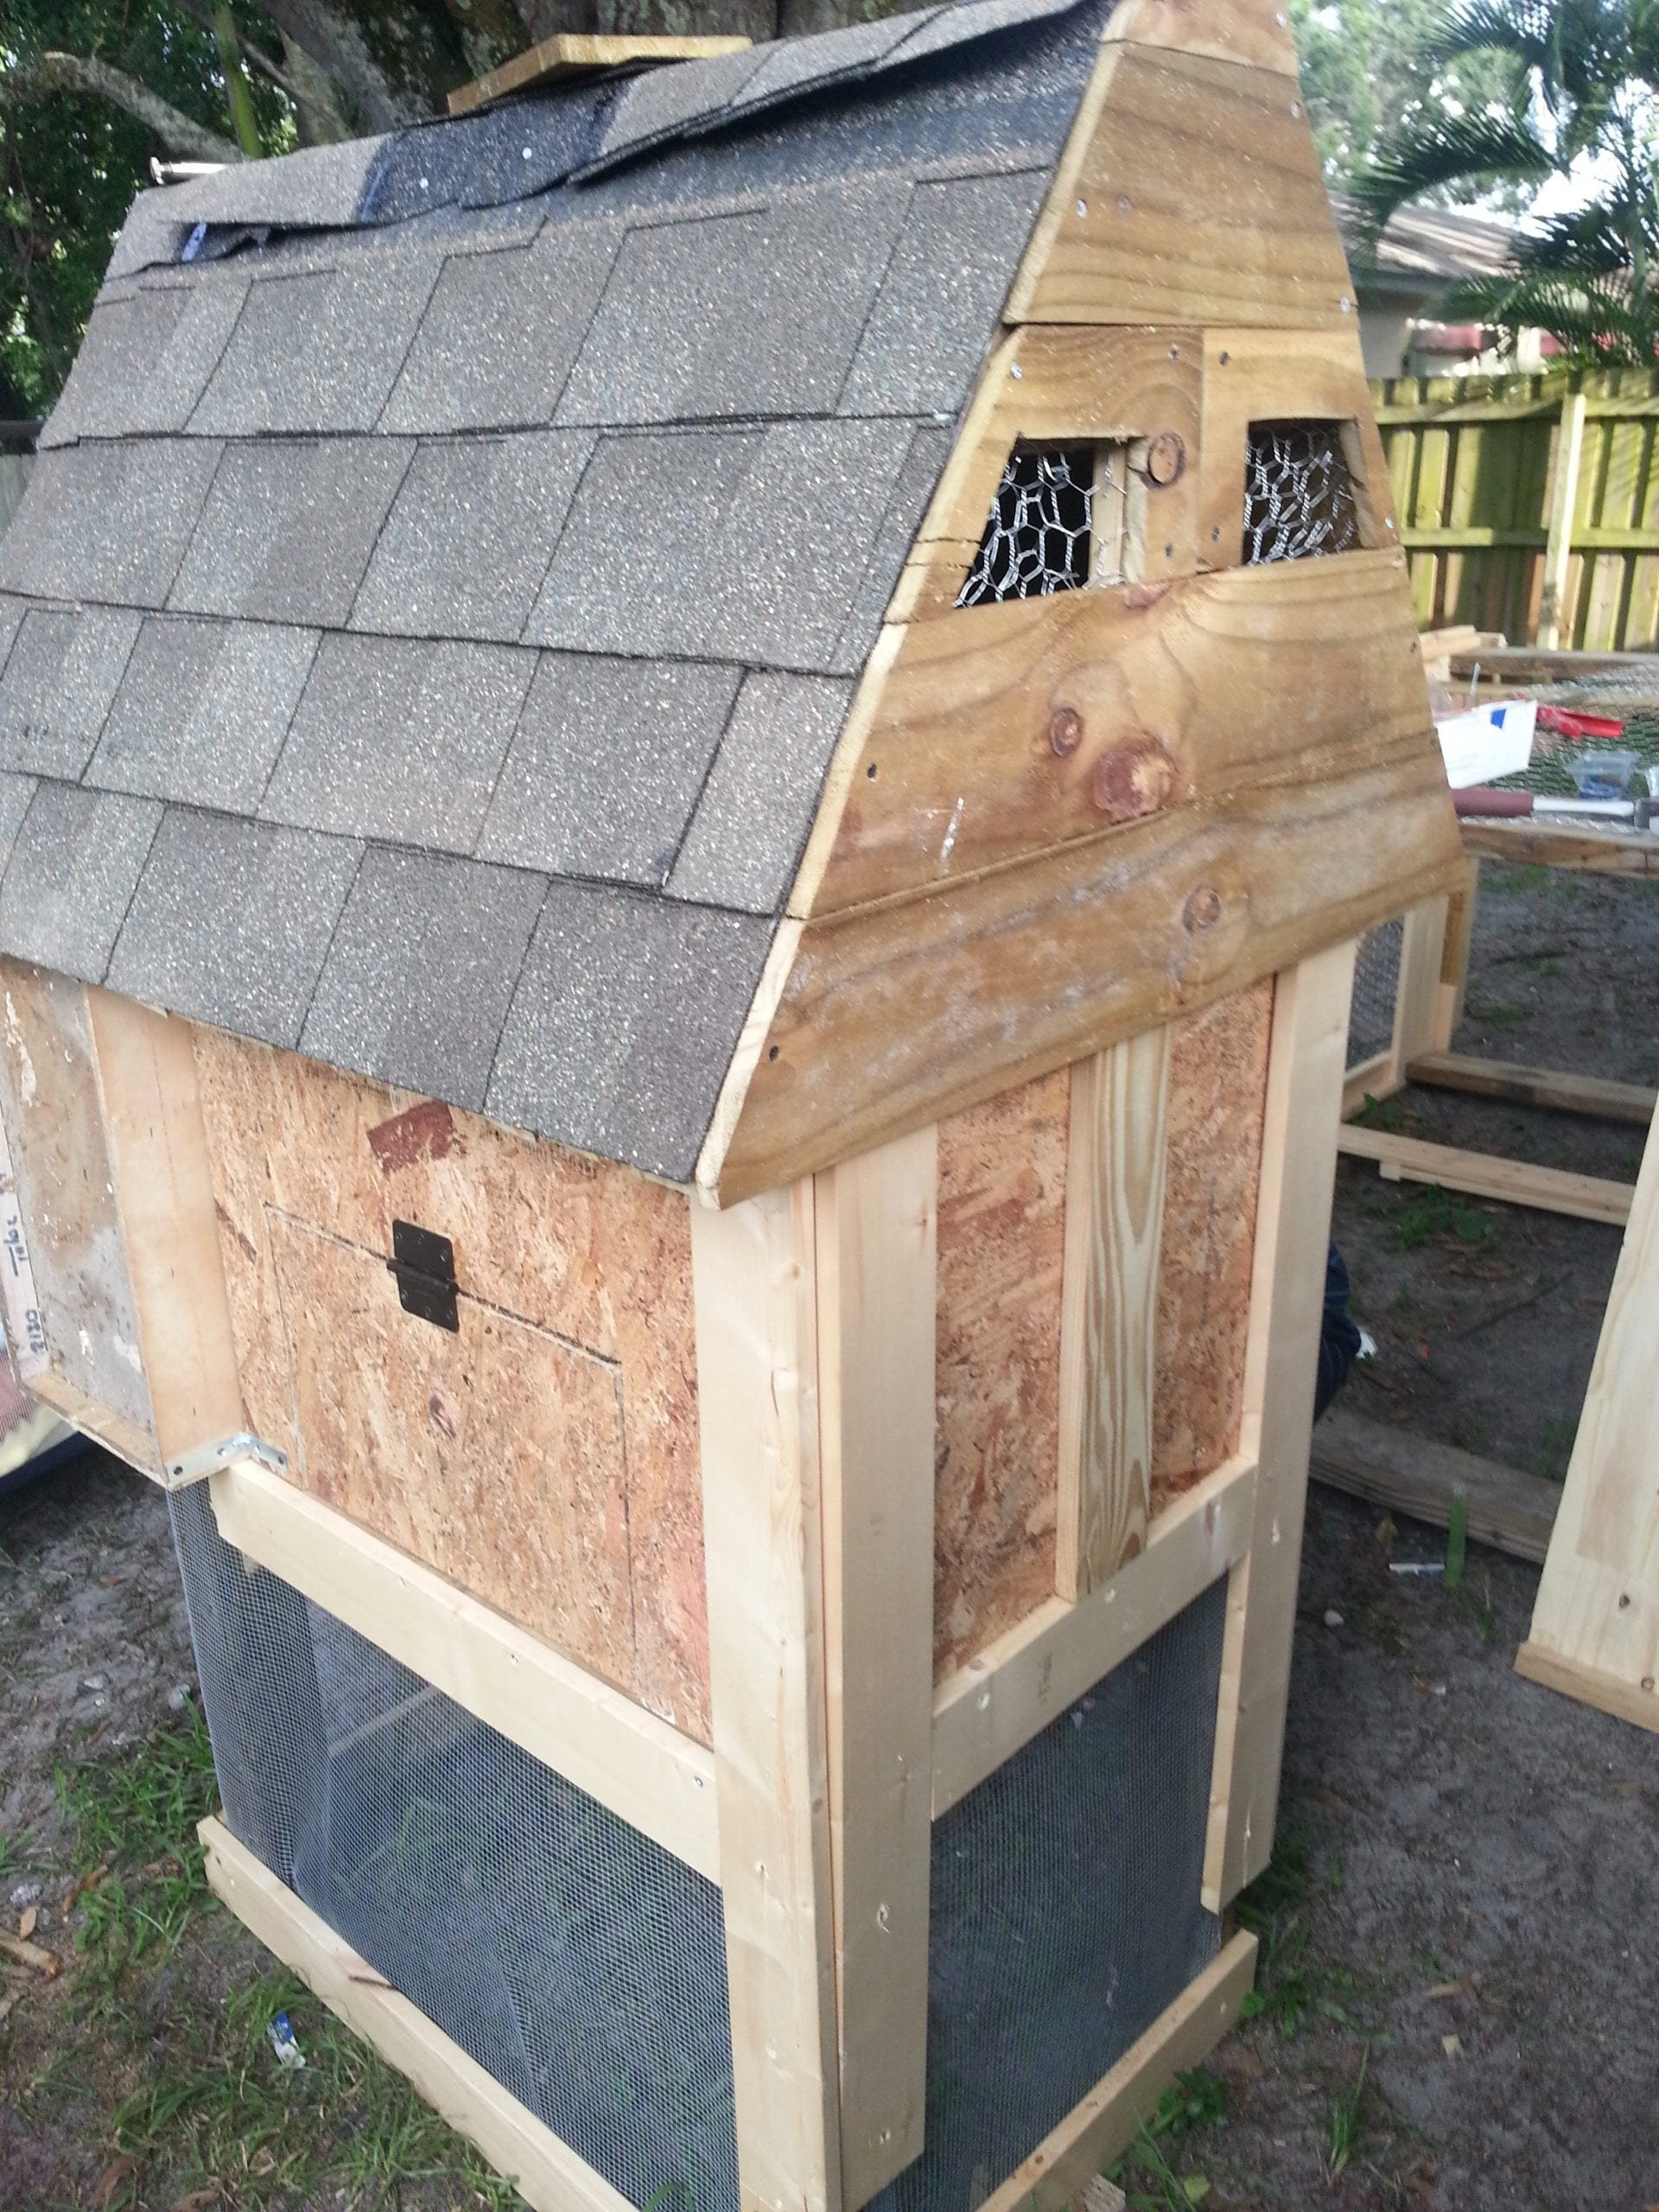
Pictured here below is the cleaning door. We used fencing for the “siding” and also fencing and plywood to double insulate the roof as well as shingles.
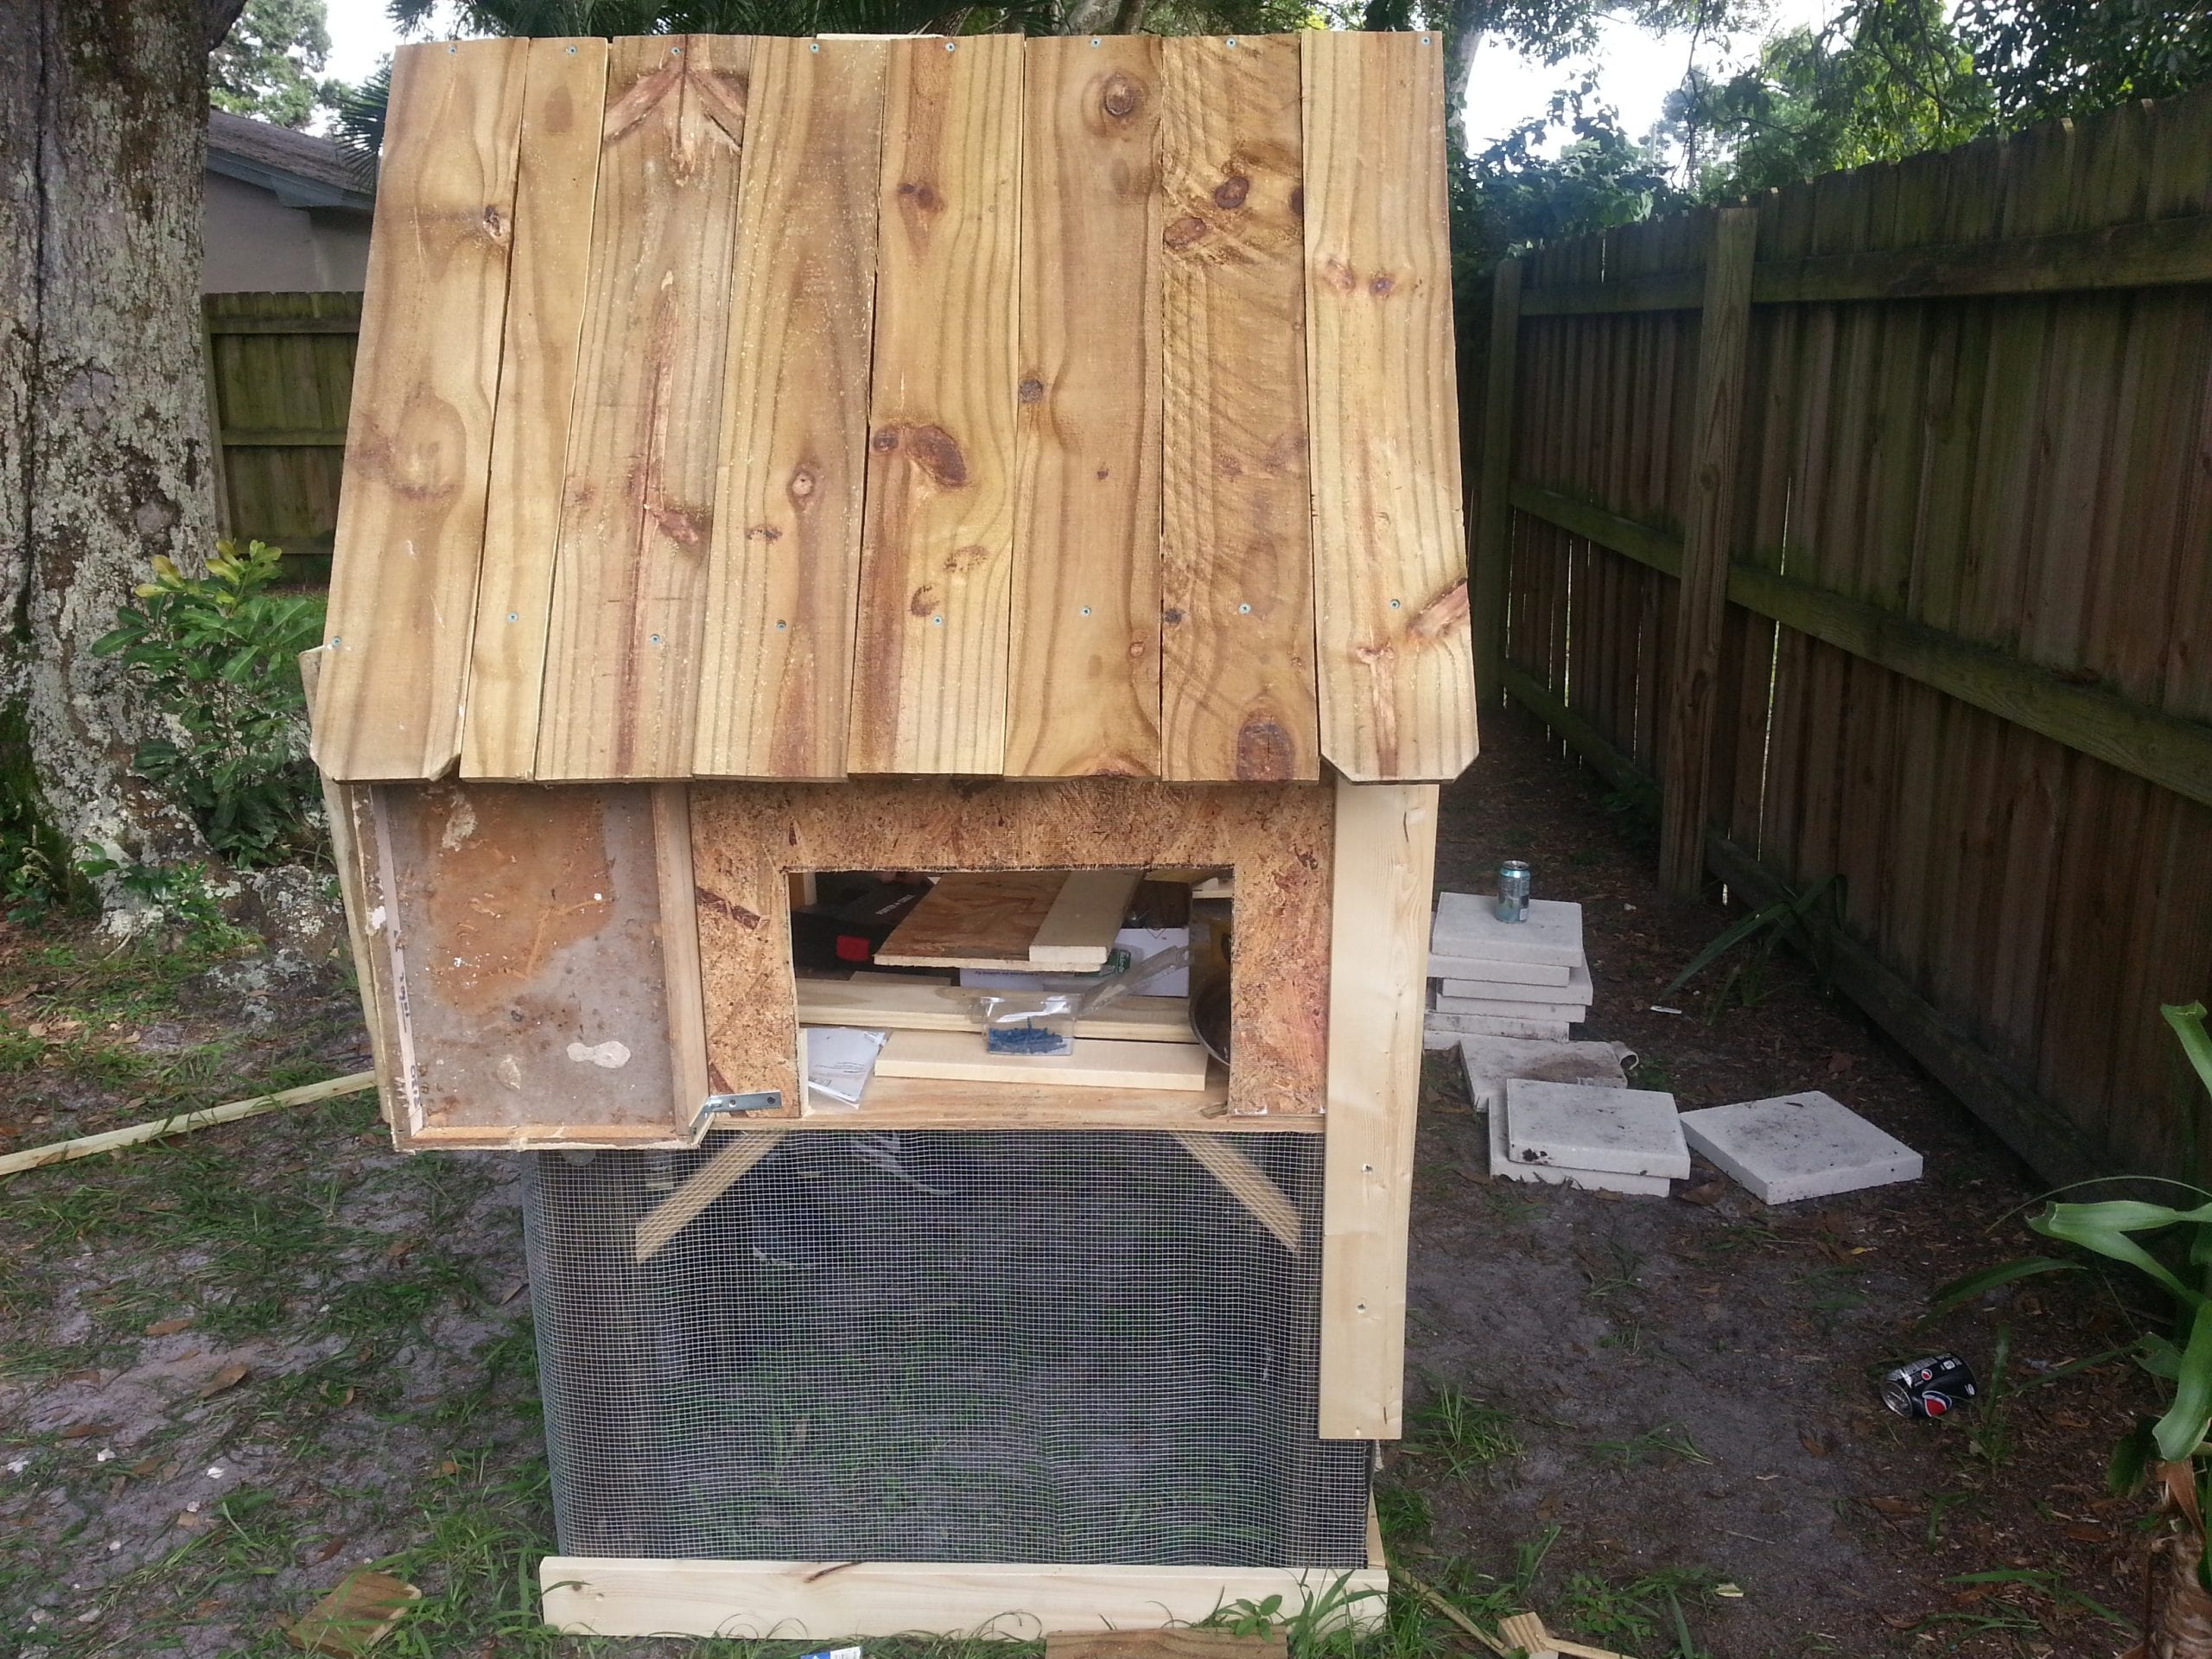
Next, we cut out our windows for ventilation. We decided to do two on both sides. Large enough to achieve a cross breeze but small enough to still be protected from elements. Underneath the coop we stapled chicken wire around securely.

Inside the coop, you want to provide an area appropriately spaced one foot apart for the hens to “roost” or “sleep”. A dowel works well.

Next, we needed an attached run. A safe place for them to get fresh air and scratch if they were not roaming supervised in our back yard.
How do you go about making a run? And what materials did we use? We used two twin IKEA bed frames. I knew I kept them for a good reason.
This became…

this…
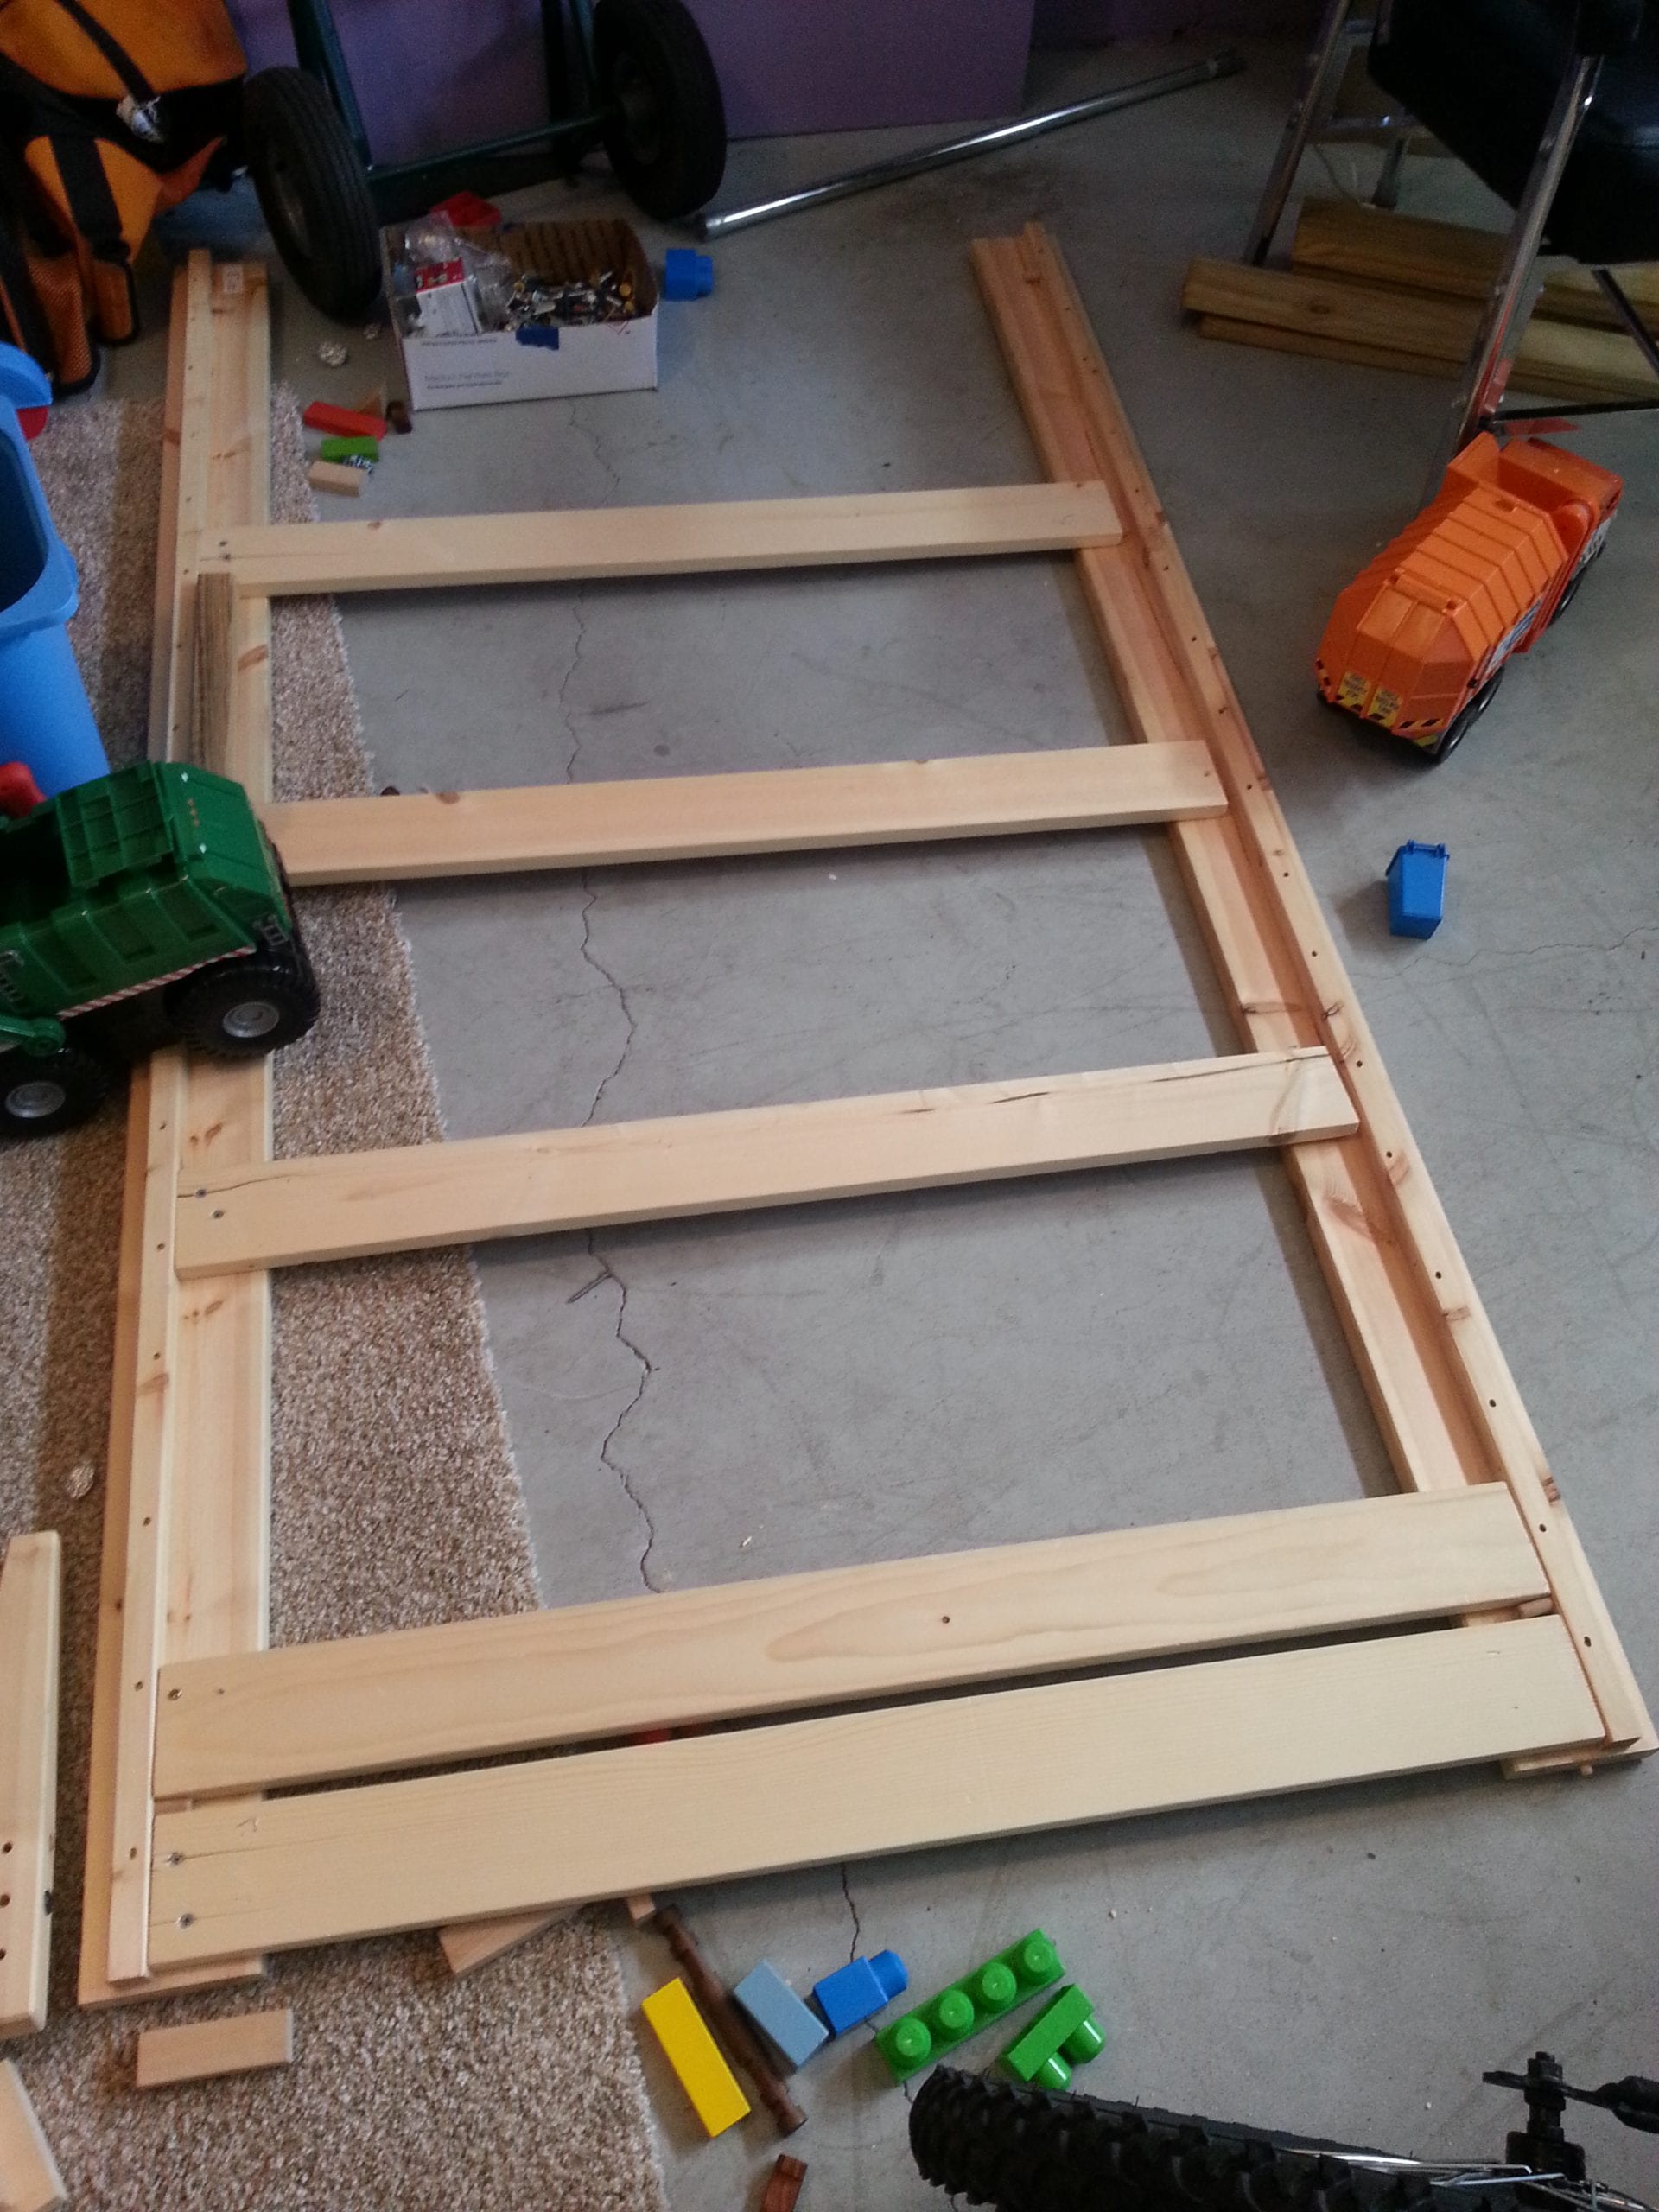
which then became this…

which then became our run. (Without chicken wire, yet.)
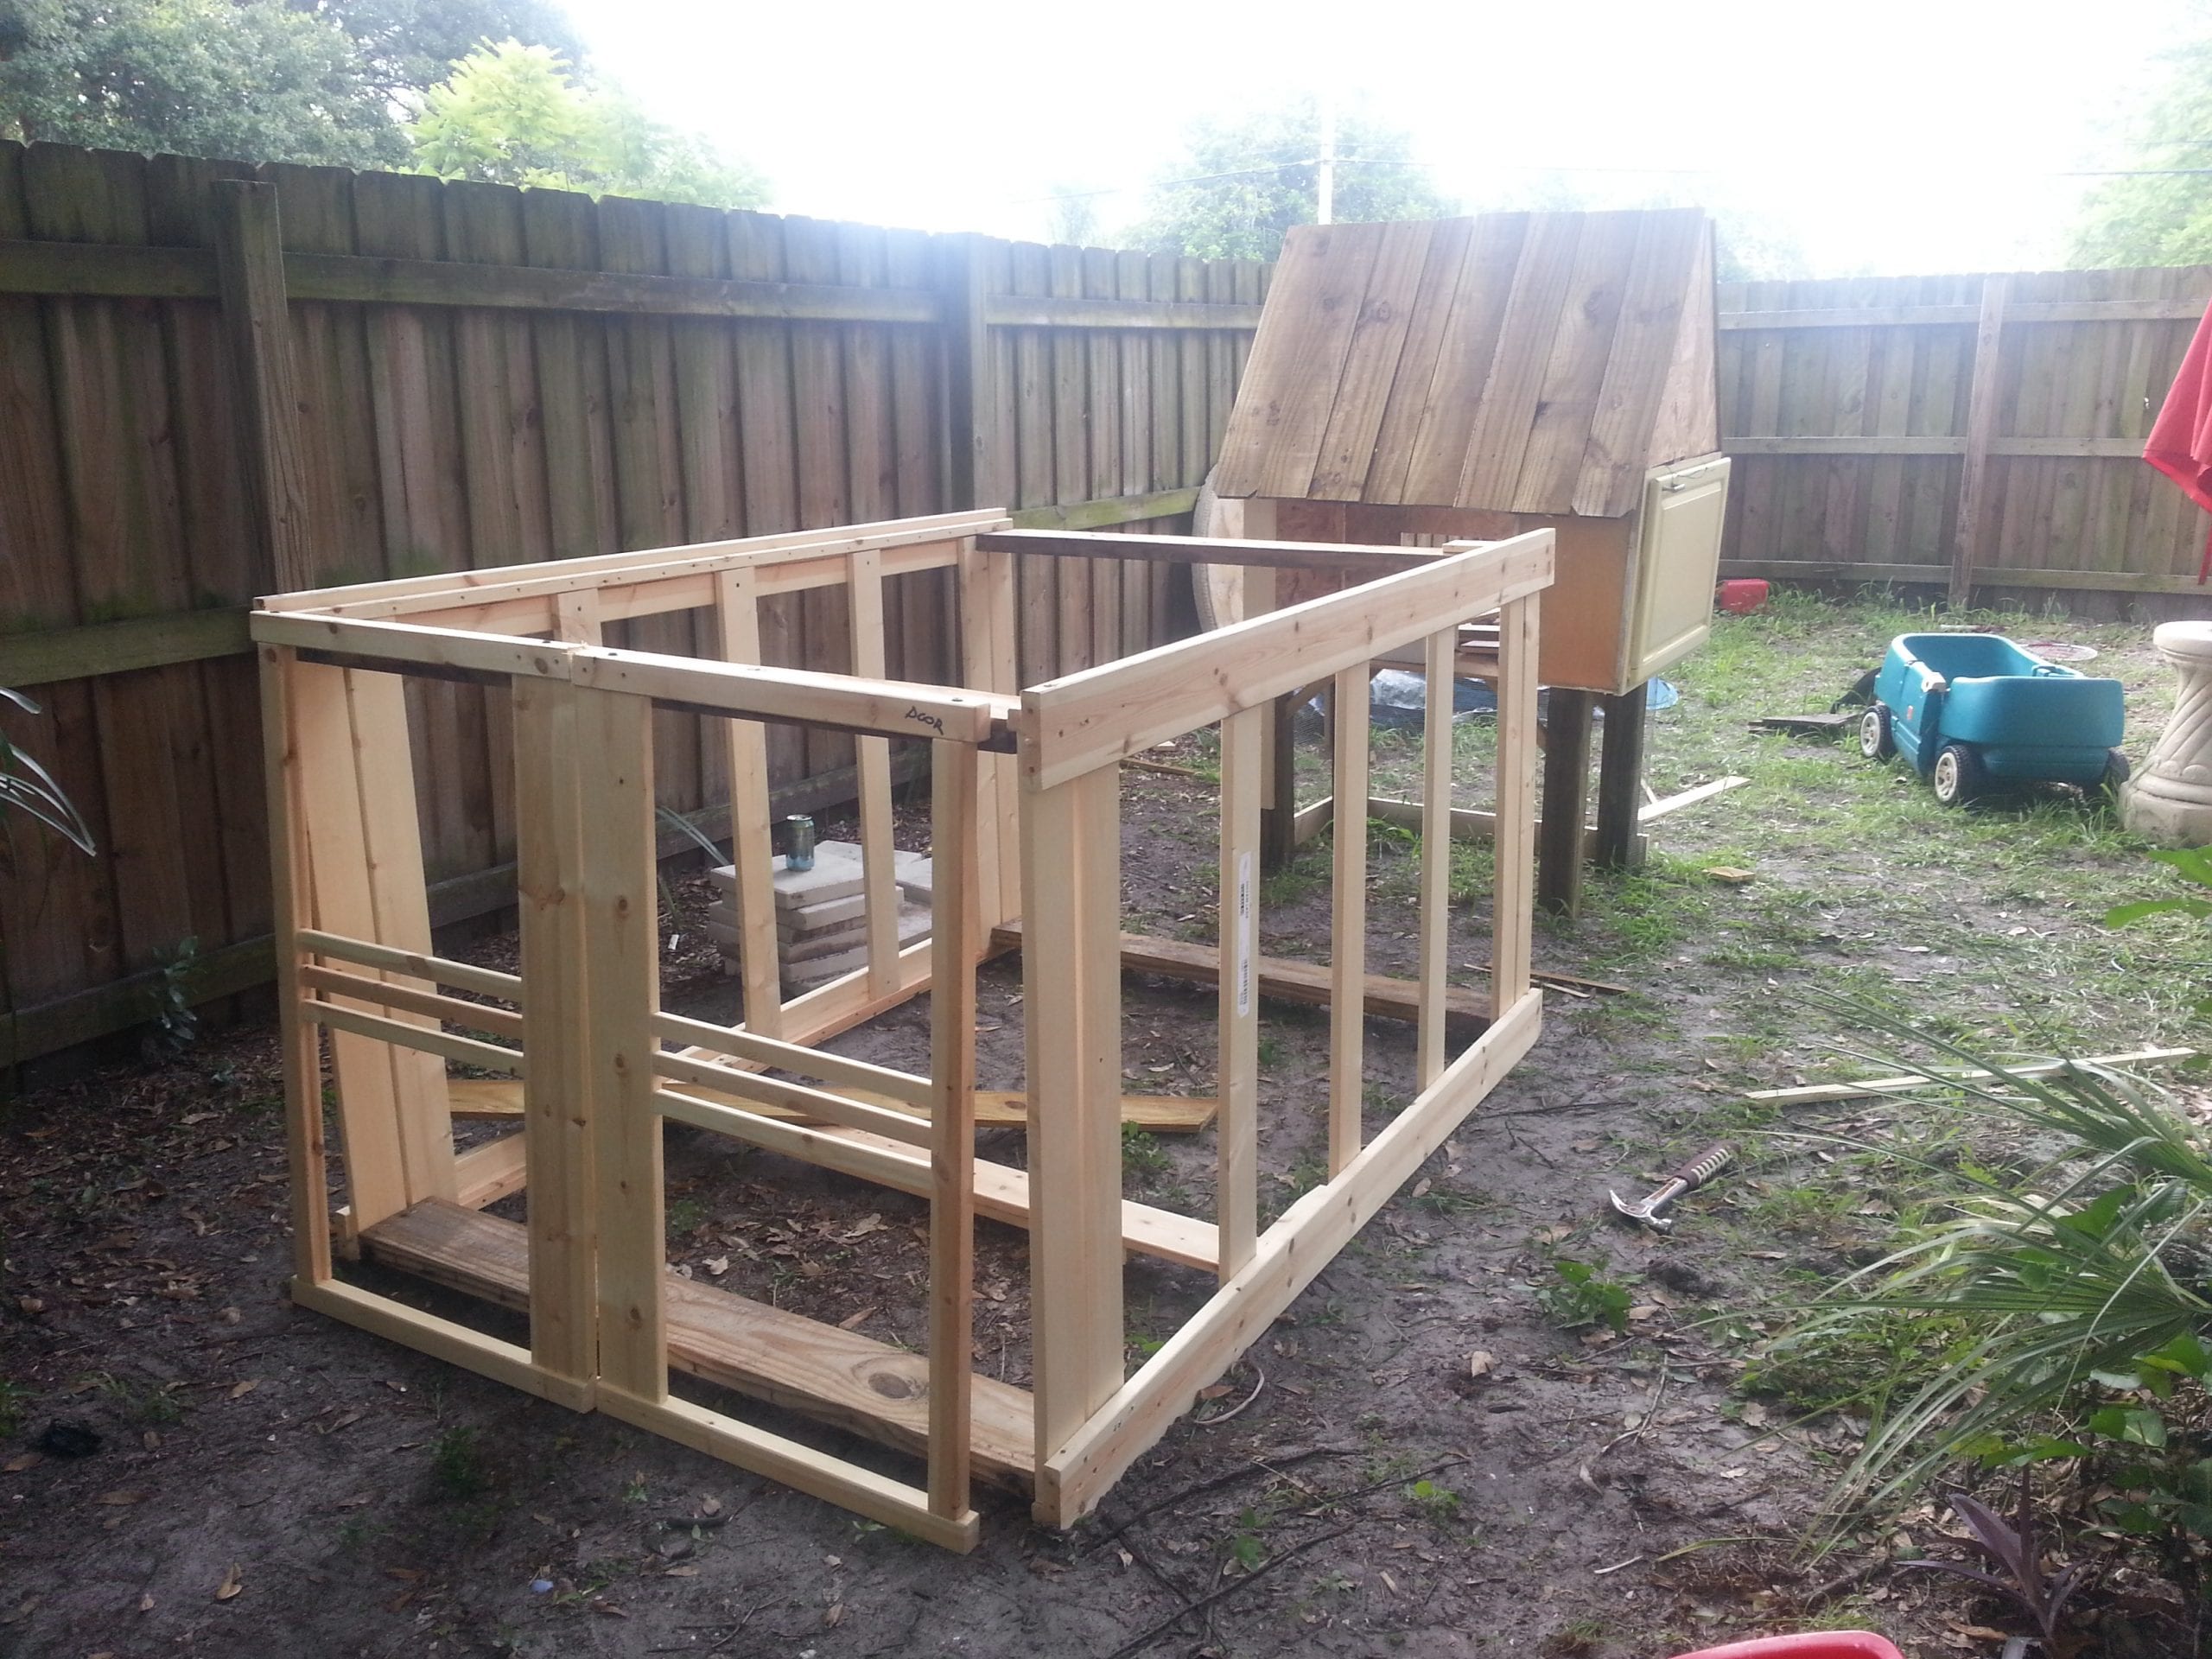
We added a ramp with small pieces of wood screwed in about every half foot up to the door of the coop from the run.


An afternoon putting chicken wire on everything, shingling our roof, attaching the run to the coop, and the final product looks like this.

If you’re interested in learning more about keeping backyard hens, my favorite resource is “Raising Happy, Healthy Chickens…Naturally”
More DIYs You May Like:

10 Healthy Money-Saving Foods You Can Grow at Home

The Great tips. I like the idea of repurposing any materials, that could be used for other projects
I am having my bf make this for me in March for my birthday, please post materials list, so it will be easier to find what’s needed. Thank You!
Congrats! Here’s a good list from Home Depot on materials needed: http://blog.homedepot.com/free-plans-for-an-awesome-chicken-coop/
An impressive share! I have just forwarded this onto a friend who had been conducting a little research on this. And he in fact ordered me dinner simply because I discovered it for him… lol. So allow me to reword this…. Thank YOU for the meal!! But yeah, thanx for spending time to discuss this matter here on your blog.
That’s amazing, Amy Jones.
it’s very amazing
many great replies&ideas
Hi. Great tips. I love the idea of repurposing any materials that could be used for other projects. I will even drive by known illegal dump sites, when looking for material. I was doing just that a couple of years ago, when a sheriff’s deputy showed up, and told me someone reported me for illegal dumping. He was surprised to see me loading some old privacy fence INTO my van – lol. He didn’t know what to make of it, or me for picking up trash, but he left with a smile. I came across this article by accident, while looking for ideas on a separate access door for food/water in a small coop I have for small pre-adults. I actually have guinea fowl, which are spoiled rotten. I even have strict rules that I lay down, before we will sell them. But we have our reasons for that. Before we sell any, we keep the keets (the equivalent of a chicken’s, chick), until they are at least a few weeks old, just to make sure that they get the proper starter feed in those early days of life, helping them grow strong and healthy. We’re also prepared for things like splayed legs, and other things chicks are prone to develop. We have a lot of that rubbery shelf liner which we switch out, during brooding, keeping our brooder clean, with a nice surface the can comfortably walk on, and sleep on. This has eliminated splayed legs by 99%. We also give our keets a lot of human contact, helping them learn to trust humans. We keep several until they reach adulthood, as well. We have a small “hobby farm”, and what we get for the ones we sale, doesn’t really cover the cost of our personal flock, but we have the opportunity to be hands on with the youngsters, and be a bit demanding of a potential buyer. Of course, I realize that once a person leaves with a bird, our expectations are not always met, and we’ve literally had the proof handed to us a couple of times… With that bit of background, I wanted to add a couple of tips, if I may. When building a coop, it should be noted that “pressure treated” wood is harmful, to both, humans and animals alike. It’s good for the outside, but should not be used within the confined space. When disinfecting used material, it’s easy for people to run to the standard household cleaners like bleach. But those products can actually cause more harm than good, even increasing an asthmatic person to be (something like) 50% more likely to have an asthma attack. Those chemicals are definitely harmful to poultry. If used, all of the chemicals aroma needs to be gone, and then give it a little longer for the air to be tolerable to their respiratory system. We have learned to use white apple cider vinegar, and hydrogen peroxide, to clean everything that we use for the guineas. DO NOT mix ACV with peroxide, use them separately, of course. Recently, my wife actually found a name brand cleaner made with peroxide, which we use in our home. NO BLEACH for the newborn poultry, or animals/humans in general. With that said, I now have to admit that we do buy chlorine from a pool supply store, which we dilute and put in a pump sprayer, for occasional large amounts of used materials, such as if we find a truck load of free/cheap lumber that is still solid, but due to being improperly stored, has some yuckiness on it. We make sure to rinse it well afterwards, and let it dry and air out before using it for our birds. We do many projects, so only the best of the worst, is ever used for any repairs, new additions, or even new coops. One of our main demands that we make before we will sell one of our birds, is that they get cooped up at night, in a coop made with hardware cloth/cage wire, NOT chicken wire. People agree to our terms. But last year we had a woman call us, crying, because she had used chicken wire, and a raccoon had pulled one of the birds out of the chicken wire. I wont go into detail, but raccoons have monkey hands, and the chicken wire was still in place. She just wanted to return the other two, due to the horror she walked upon. When she first called, I was.., let’s just say that I “was not happy”. We didn’t trust the birds with her anymore, and luckily, my compassion jumped in, and we both (my wife and I) felt she was traumatized enough, so we took them back without giving her the angry lecture, that I first wanted to give her. I live in Florida, so another big concern is lightening. This plays a factor in the placement of coops, as well as the building material that they’re made from. A metal shed is a conductor. People also like to put the coops in the shade, such as under trees. And sometimes, they like to use part of an existing fence line as one side of a run. Lightening will take the path of least resistance, and trees are easy prey. And, if there is a strike too near a fence, it can continue to electrify a fence line, much, much further than one may realize. There are plenty of stories from people who have lost entire flocks in one lightening strike, because they did not take it into consideration. Then again, I may be like the proverbial “crazy cat lady”, only, the “crazy guinea fowl guy” – lol. I guess it would really depend on how attached a person may get to their poultry (or other confined animals), and what they want to walk out to when they go out to when feeding, or collecting eggs. I’m sorry that I rambled in such detail, turning this simple comment into something more like a pamphlet. I just wanted to add a few other things for people to consider. The short version is, “Raising poultry, can be addictive. Proceed with caution!” – lol. Thanks…
Thanks for sharing, Marty. Great suggestions for someone to consider!
Thank you for all that info Marty!
I literally LOVE everything in your post. I thought I was the only person out there that had strict terms in the sale of poultry and one who keeps babies to give the best start and imprint. I love the way you do things. If people only knew what amazing pets poultry can make!
Awesome! I’m getting 2 chicks tomorrow. This will be a lot of help!.Thank so much :0)
Awesome, Retta! Congrats!
Great, I used woodprix plans to do it
We built a chicken coop out of a large shipping crate… cut out doors and built nesting boxes in the coop.
Wow, that’s awesome! Great use of materials.
Just love this post! Found it on Pinterest. Great tutorial about how to DIY a chicken coop. We recently purchased a home and I’m getting ready to do a post about our backyard dreams (which includes building a chicken coop) later this week and I’d like to include a photo of Coop Tutorial with a link back to this post with your permission. If you have any questions or concerns, feel free to email me at thejohnsonsplusdog at gmail dot com.
Thank you, Chelsea. Yes, you’re welcome to use an image with a link back :). Thank you for sharing.
How many chickens can live in a coop this size?
Hey Sophie, The general rule is 4 sq. feet per chicken in the actual coop. Candice, the author, had three chickens in this coop. She has since expanded her flock.
OMG Kristin, This is one hell of a awesome Post. I mean in very detail and with pictures. Couple of days ago My cousin Bought an Ebook. I wish i could have found this article a bit earlier so that i could have pointed her here.
Thanks
Jenny
Thank you, Jenny. I hope she enjoys the book!
is there was way to get plans for a chicken coop made cheap i have no idea how to build one
Hey Rebecca, We Googled a basic search “free chicken coop plans” when we made our coop and found many plans! That’s my top recommendation. 🙂 Another idea is to join chicken groups in your area (on Facebook) and ask if anyone can share their plans. Many people have drawn plans they’re happy to share.
The coop is cute and great idea doing one for under 50 bucks. However, I wish a little more research was done into building your coop, the first thing you should have stumbled across was hardware cloth instead of chicken wire. Chicken wire was only meant to keep chickens in, but dogs, raccoon and possums can rip through it like it was paper. 1/2″ or 1/4″ hardware cloth is the only appropriate fencing that should be used on coops and runs. I don’t mean to be a killjoy and you have such a cute coop, but that’s a point of misinformation that others might think oh that’s ok to use that and will only end up coming out to a very gory scene one morning. Don’t think any of us want that for someone.
Thanks for sharing, fidgets. We don’t have much of an issue with predators in our area, but each area is different and coops should be built accordingly.
this is genius! It’s so cute and it has such personality! I hate the plain cookie cutter coops they’re so boring. This is much more fun! 😀
Thank you, Lily :).
Hello
Very nice coop! Can I use some photos in my website? http://chickencoopsplans4u.com
Hey Caroline, Thank you. Photos and written material are copyright protected here at Live Simply, so we don’t allow people to use our material (photos, recipes, written articles) for their website. Thank you for asking.
Hi, Lily, I think you and hubs picked a beautiful design to build and I am especially proud that you follow the same philosophy I do – reuse, recycle, reduce. It bothers me not one iota to stop alongside the road and go through another man’s junk, sometimes not even knowing what I’m looking for. So kudos to you for doing that. I would like to suggest that you keep your eyes open for hardware cloth to replace the chicken wire. As it was told to me, chicken wire serves only one purpose, that is to keep chickens in. It will not keep any predator out. The only lock a racoon can not unlock is the old screen door latches we all knew as kids. I suggest buying new, and get the ones with the spring on them. Coons have not figured that one out yet. All others, including the barrel bolts are easy pickings for a coon. They can also reach through the chicken wire and still kill your birds. Other predators are just as nasty. A roll of hardware cloth will cost you more than you’ve already spent. Look for some on CraigsList under “free” or on your local freecycle website. Excellent job. I wish mine looked as good.
Thanks for sharing, Bob! Very good to know. I’ll have to look for some hardware cloth.
Awesome article! Thanks for the information & inspiration. One small thing though… I think you meant “emulate” not “immolate”. Immolate means to kill or sacrifice via burning. Teehee!
Hi Lily, Glad you enjoyed the post. I’ll let the writer know about the correction.
We built a 4X8 coop for almost nothing by walling off one end of an already existing 8X16 rabbit shed that we’d built several years previously, also made by scrounging almost all of the materials, & adding a fenced pen outside. I think the only thing I bought was a bag of nails.
My hens, like yours preferred to share one nesting box rather than use both of the ones I made them. Silly girls!
That’s awesome, Judy! Thank you so much for sharing. Funny chickens!
the word immolate means “destroy with fire”
Good article, I am inspired to build a similar coop. My goal will be to do it as cheaply as possible. You might want to find a way to attach your coop to the ground. A wind storm can do a number on these. (Ask me how I know.) Thank you.
Thank you, Ashley. Great tip!
“Emulate” – to match or surpass
I enjoy the humor in your writing style, Candice!
Just be aware that chicken wire only keeps chickens in, but not predators out. Never use anything but hardware cloth if you want them to live. And stapling the wire will allow coons to easily rip it off. Be sure to use roofing nails to hold your hardware cloth.
Thanks for sharing, Victoria.
There are many advantages to owning your own chickens. Farm fresh eggs are healthier, tastier, and readily available from your own back yard. Meat birds are fast growing, take little space to raise and are fairly inexpensive for the resulting outcome in food production. Raising your own chickens means you get to decide what goes into the making of the final product.
Is there a printable list of supplies needed to build one ? I am doing it all myself, so I need all the help I can find 🙂
Hey Eva-Marie Howard, We don’t have a printable for this post. Here’s a great book that may help: http://amzn.to/1QIRNYL.