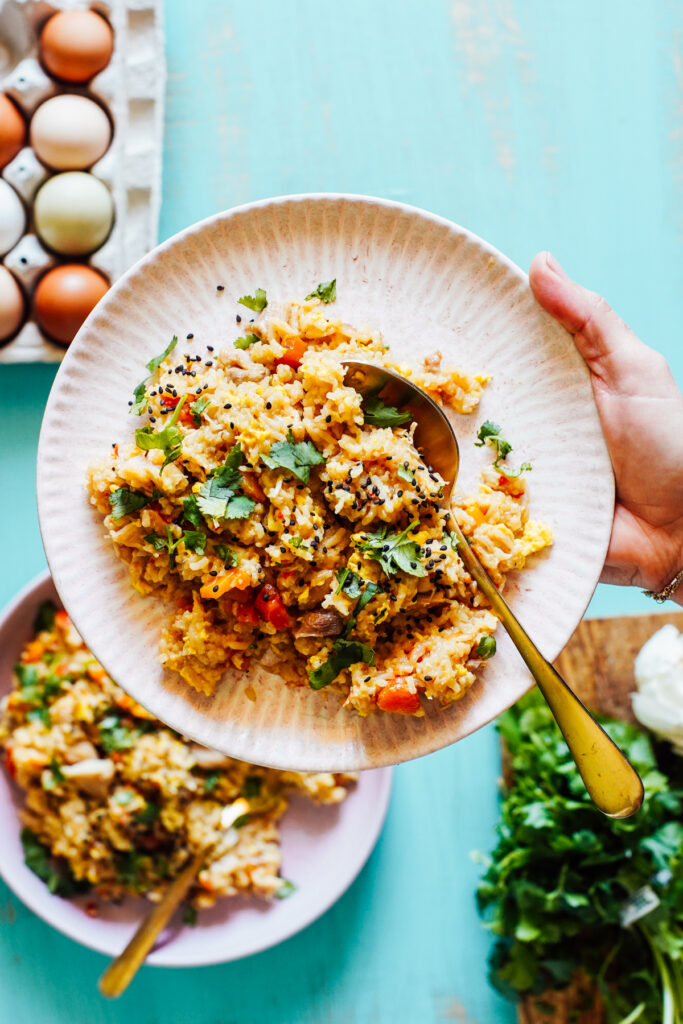
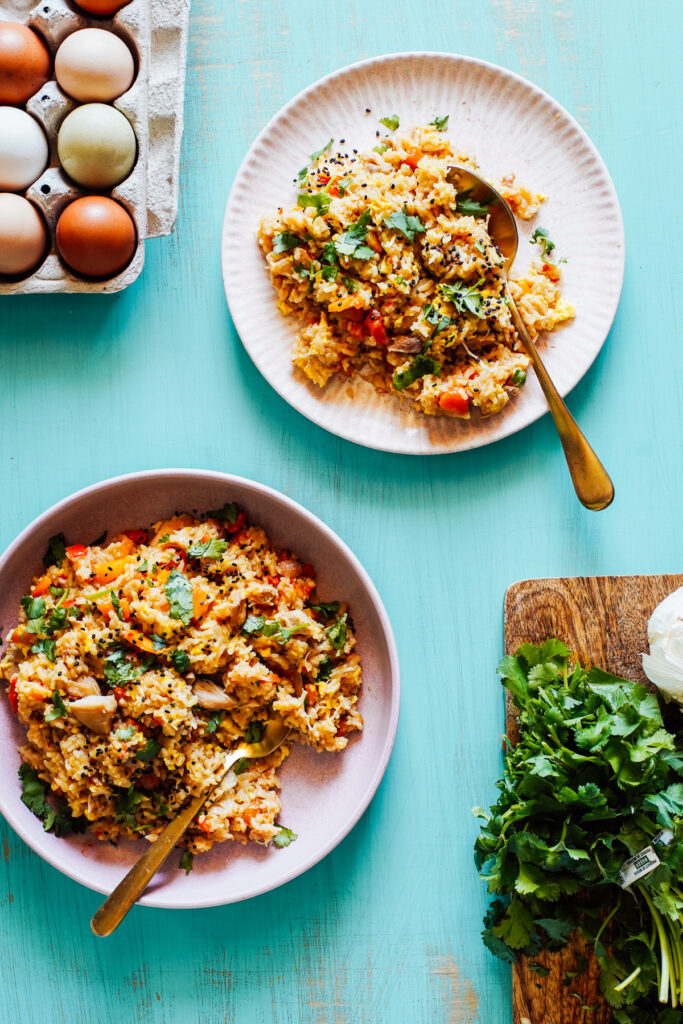
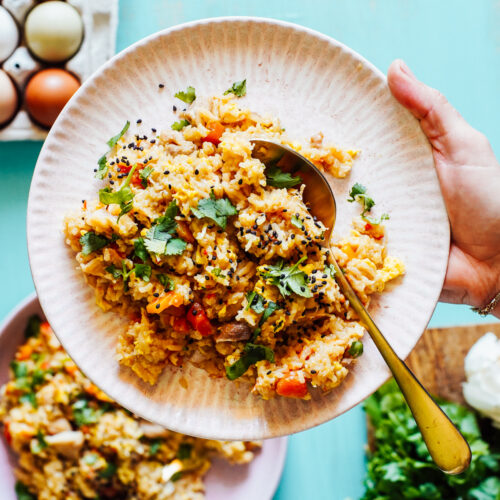
We love making this easy Instant Pot Chicken Fried Rice recipe. It’s affordable, healthy, and made with real-food ingredients! Plus, it’s a one-pan meal that’s ready in 20 minutes and leftovers make for an easy lunch.
Want to Save This Recipe?
Enter your email & I’ll send it straight to your inbox. And you’ll get new recipes & tips each week.
What Readers Say
“I love this recipe!!! Have made it twice so far and it will definitely become a staple weeknight dinner for us.”
LAURA H.
This recipe isn’t authentic. The first fried rice recipe is believed to have originated in the Sui Dynasty (A.D. 589–618).
This recipe is definitely an Americanized version. If you’re looking for a truly authentic recipe, this isn’t your dish. I don’t have the knowledge to share such a recipe with you.
If you’re looking for a variation of fried rice that’s made quickly in the Instant Pot, with real-food ingredients, then this has become a go-to weeknight meal that I’d love to share with you. It’s a homemade, quick-fix version of my favorite takeout meal, without the MSG.
To make fried rice, you typically need to make the rice ahead of time (like 15-minute vegetarian fried rice or veggie fried rice). Leftover, day-old rice is usually best for making a fried rice recipe.
With the Instant Pot, you don’t need to prep rice in advance. Instead, you can cook rice, chicken, veggies, and even the egg in one pot!
That’s what I love about this appliance: it make healthy meals fast and easy!
Ingredients and Tools Needed
To make Instant Pot Chicken Fried Rice, you’ll need a handful of pantry ingredients. This makes the recipe easy to prepare and super affordable. (Here’s what I stock in my real-food pantry.)
We’re all looking for ways to save on groceries these days. Rice, chicken, eggs, and carrots are all budget-friendly ingredients. I tend to stock up on rice and chicken when they go on sale, and freeze the chicken for meals.
Ingredients and Tools
What kind of rice is best to use?
The best rice to use for this recipe is uncooked white rice. White rice only takes 4 minutes to cook in the Instant Pot. Brown rice takes 20 minutes! The chicken only needs about 8 minutes to cook, so using brown rice would dry out the chicken.
This is why in recipes like Instant Pot Chicken and Yellow Rice and Instant Pot Chicken and Rice Soup, we use white rice. It cooks quickly, keeping the chicken moist.
I use long grain white rice, but I think jasmine or basmati white rice may also be used, with no time adjustments.
If you want to use brown rice in this recipe (long or short brown rice), use chicken thighs as the fat content will help compensate for the extra cooking time needed. I haven’t tested this recipe using brown rice or a 20 minute cooking time.
Learn how to cook rice in the Instant Pot, with cooking times and water to rice ratios.
How to Make
With just pot (an electric pressure cooker), you can quickly make this lunch or dinner meal. This recipe moves fast! Arrange all the ingredients on the counter, chopping the veggies and uncooked chicken, and rinsing the rice before getting started.

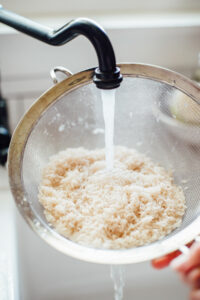
Step 1: Rinse the Rice
Rice is very starchy, and there is excess starch on the outside of the grains, particularly white rice. If the starch is left on the rice, the result will be wet, mushy fried rice.
One key to fluffy Instant Pot rice is to rinse the rice in a fine-mesh colander. To do this, add the rice to the colander, then run it under water for about 1 minute until the water streaming out of the colander goes from milky to clear.
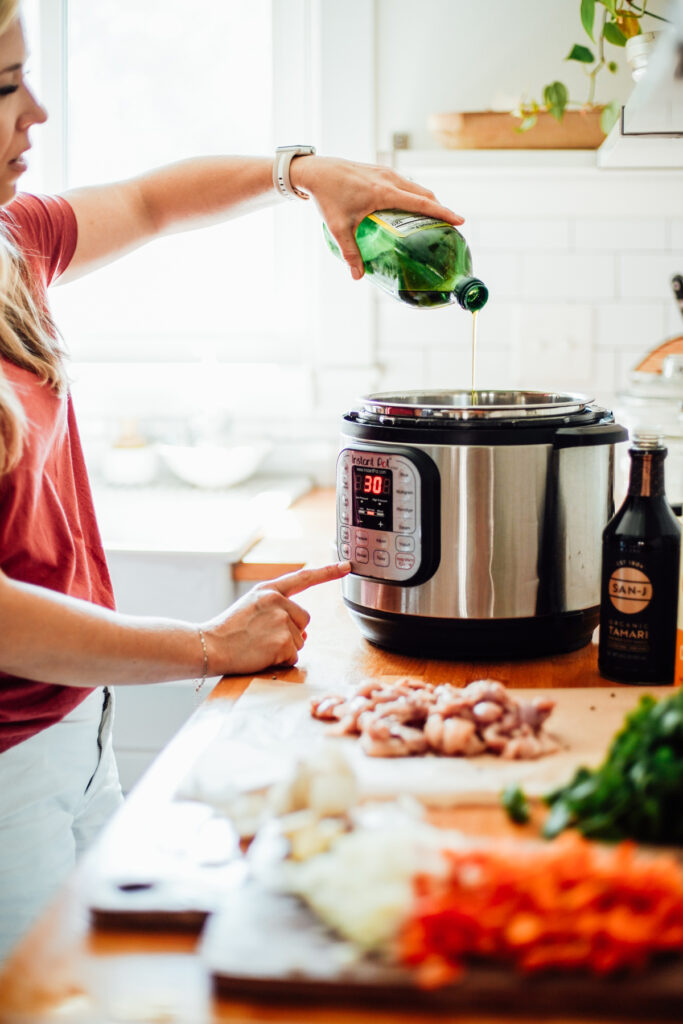
Step 2: Saute Chicken
Turn on the Saute mode on the Instant Pot by pressing the Saute Button. Cut the chicken breasts into smaller pieces and salt and pepper the chicken.
Heat oil in the Instant Pot and use the saute function to quickly cook the chicken on each side (about 2-3 minutes on each side).
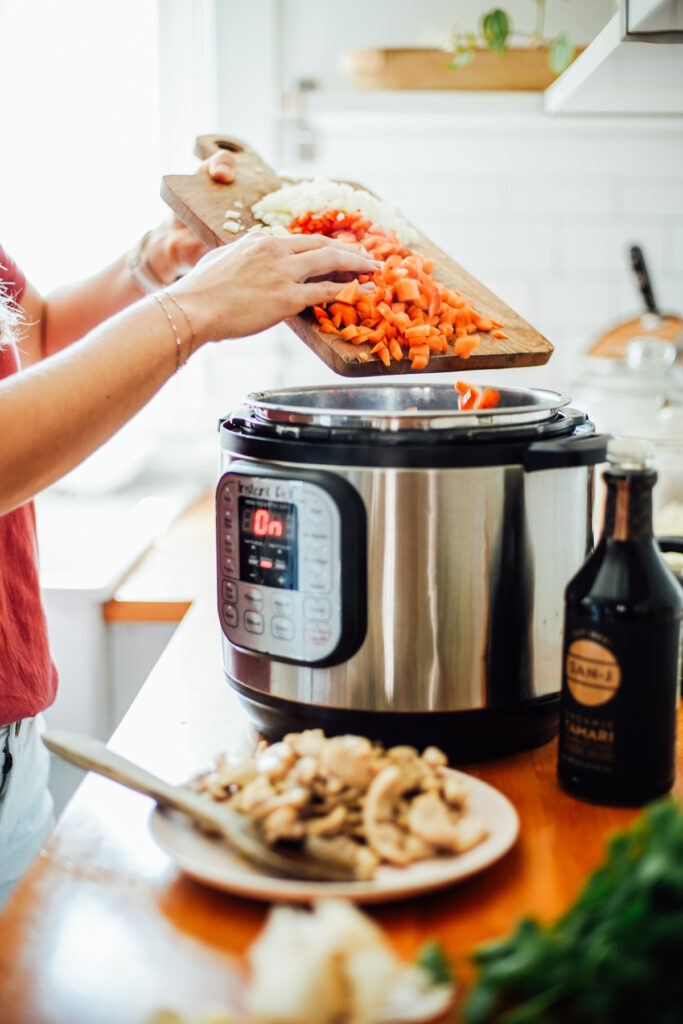
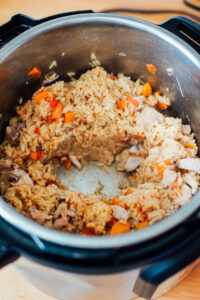
Step 3: Add Vegetables
Remove the chicken from the Instant Pot to a plate or bowl. Add chopped carrots, onion, and red bell pepper to the hot Instant Pot. Saute for a couple of minutes, then add minced garlic. Turn off the Saute Button.
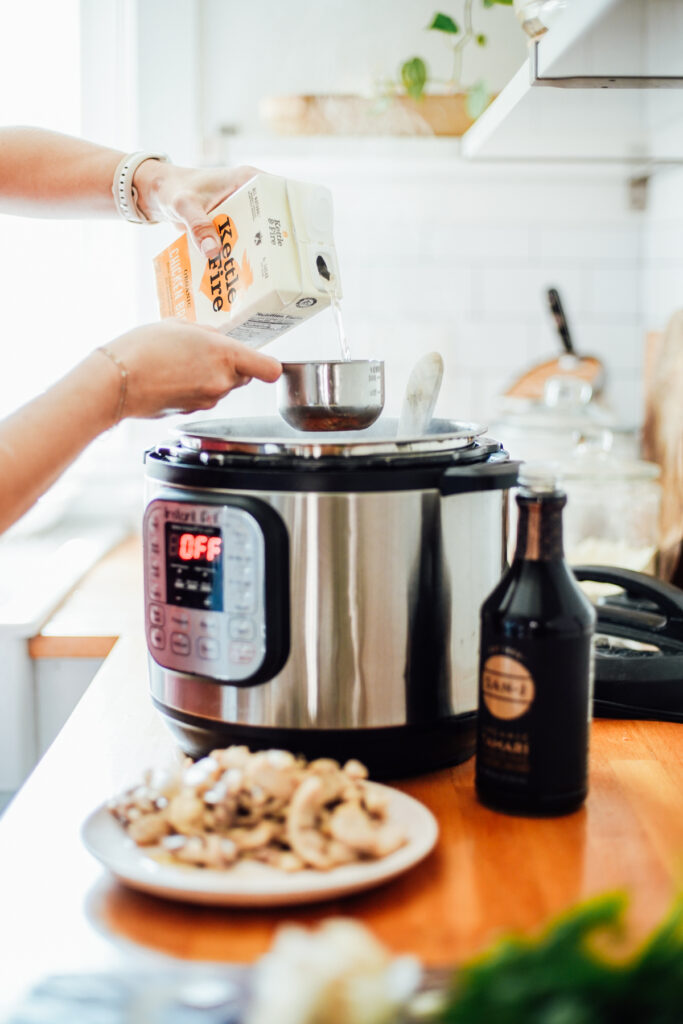
Step 4: Add a Splash of Chicken Broth
You don’t want any food stuck to the bottom of the Instant Pot. This can cause a burn notice.
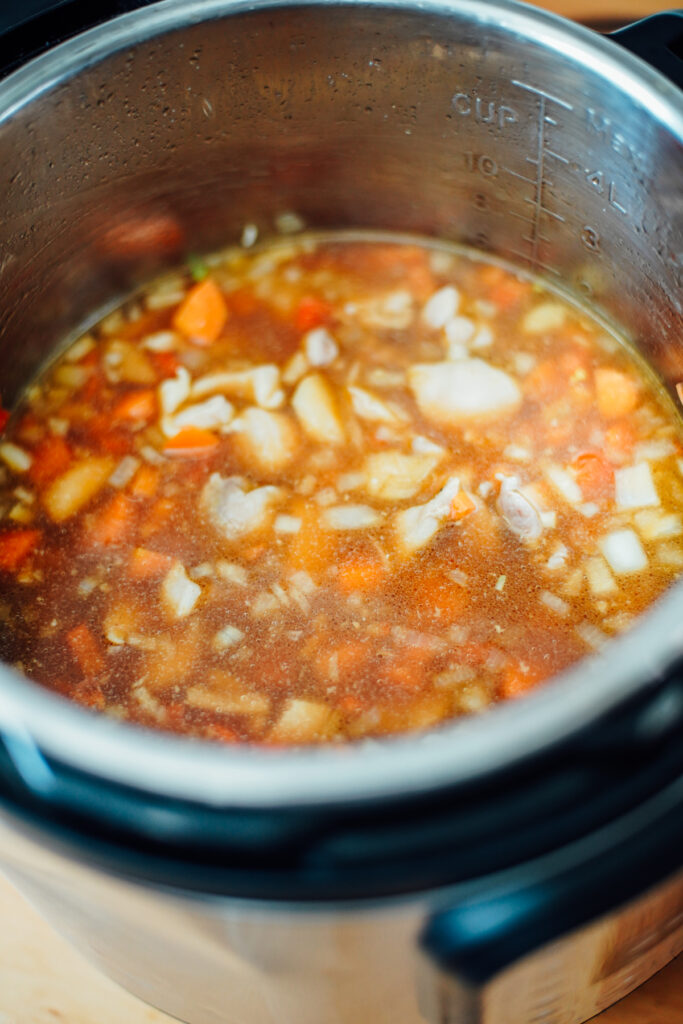
Add a splash of chicken broth to the pot, using a wooden spoon to scrape up any bits stuck to the bottom. Then add the remaining chicken broth, tamari sauce (or coconut aminos) and uncooked and rinsed rice. Give everything a stir. Then add the chicken.
All ingredients should be submerged in the liquid, with chicken popping out.
Step 5: Pressure Cook
Make sure the clear silicone ring that sits inside the Instant Pot lid is secure (if it’s not secure, the Instant Pot will not work properly), then place the lid on the Instant Pot base and turn to lock.
Place the lid on the Instant Pot and turn to lock in place. Move the knob on top (venting seal) from Venting to Sealed. This will trap all the steam in the pot, allowing the meal to pressure cook properly.
Select the Manual Button, then use the minus button to adjust the time on the screen to 8 minutes.
Step 6: Natural Release for 10 Minutes
Once the cooking time is complete, the Instant Pot will beep. This means the pressure cooking time of 8 minutes is complete.
Now it’s time for the pressure to release from the pot. There are two ways for this to happen: natural release or quick release. I explain the difference in How to Cook Instant Pot Rice.
For this recipe, you’re going to let the Instant Pot release pressure naturally for 10 minutes. The timer on the front screen will slowly begin to count up from 0:00 to 10:00. Once the timer reads L10:00 (10 minutes), use a towel or hot pad holder to turn the knob/valve on top from Sealed to Venting.
Steam will shoot out from the top of the Instant Pot. Make sure the pot isn’t under any cabinets. Once the pressure is fully released (steam no longer is coming out of the top), you can safely open the lid.
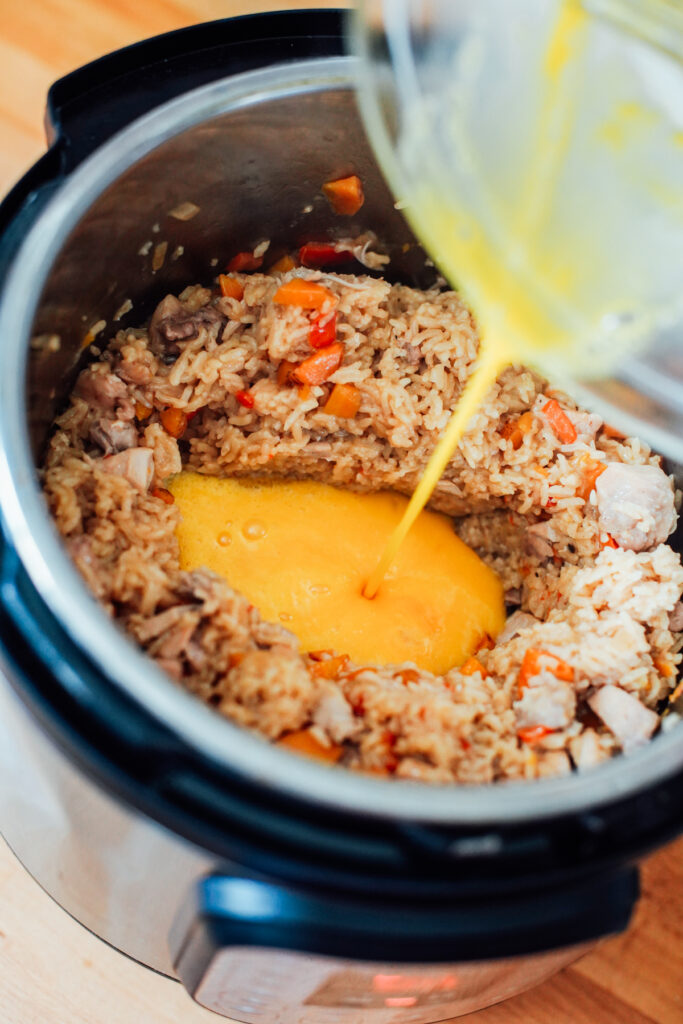
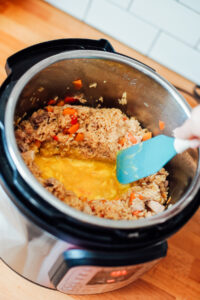
Step 7: Scramble Eggs
If you want to make Instant Pot fried rice with eggs, make a well in the center of the fried rice by pushing the rice to the perimeter of the pot.
Melt 1 tablespoon unsalted butter. Crack 2 eggs in a medium-size bowl.
Remember when we talked about how to make scrambled eggs fluffy and without milk? One key to fluffy eggs is to whisk the eggs vigorously.
Whisk for 20-30 seconds with a fork. Then add the eggs to the melted butter.
Let the eggs set for a few seconds, and once you see some setting on the sides, use a rubber spatula to begin moving the eggs around. Allow to set again for a few seconds, then move. Repeat this until the eggs are fully cooked (about 3 minutes).
How long does it take to cook this recipe?
This recipe is quick and easy to make, promise! Here’s what to expect…
15 Minutes: Prep Ingredients
Rinse the rice, chop the veggies and chicken, saute the chicken and vegetables.
18 Minutes+: Cooking Fried Rice
Once the lid is on the pot, it will take the Instant Pot several minutes to begin pressure cooking. The pressure has to build up and this takes time. This could take anywhere from 5-10 minutes. This is one aspect of Instant Pot cooking that people don’t talk about.
Once pressure is reached, the Instant Pot will take 8 minutes to cook and then need 10 minutes to release the pressure naturally.
5 Minutes: Cooking Egg
If you want to add eggs to the fried rice, factor in about 5 minutes for melting the butter and cooking the scrambled eggs.
You can make Instant Pot Fried Rice in under 20 minutes of cooking time. But also factor in some prep time and a few extra minutes that it will take to patiently wait for the Instant Pot to reach pressure and cook the food.

Tips for Success
There are a few things to consider when making fried rice in the Instant Pot. Stick with these tips for recipe success.
- Use a 6 or 8 Quart Instant Pot: There’s a fill line inside every Instant Pot liner. You never want to go over this line. For this reason, I don’t recommend using a 3-Quart Instant Pot. The 6 or 8 Quart models are best for the amount this recipe makes. This is the Instant Pot I use.
- Rinse Rice: Rinsing the rice first, before cooking, under water in a fine-mesh colander will prevent mushy fried rice.
- Avoid the Burn Notice: Add a bit of chicken broth after sautéing the chicken and veggies. Use a wooden spoon to scrape up any bits left on the bottom of the pot. These bits will trigger a burn notice if left on the bottom before pressure cooking.
Storage and Reheating Tips
This recipe makes the best leftovers so it’s a great meal to make for dinner and serve for lunch the next day. Meal prepping at its finest!
- How to Store: Store leftover rice in an air-tight container in the fridge for up to 4 days.
- How to Reheat: Reheat the rice on the stove-top with a splash of water (to keep things moist), or in the microwave.
- School Lunch: Place reheated fried rice in a thermos for a hot school lunch. See 8 more hot school lunch ideas.
- Work Lunch: If you have a microwave at work, I love glass meal prep containers for taking the fried rice to work and reheating.
5 FAVORITE
Easy Chicken Recipes
20-Minute Instant Pot Chicken Fried Rice
Equipment
- 1 6 Quart Instant Pot Or 8 Quart
- 1 medium bowl
Ingredients
- 2 cups long grain white rice
- 1 lb boneless skinless chicken breasts about 3 chicken breasts, cut into smaller pieces
- 2 tablespoons extra virgin olive oil or seasame oil
- 2-3 medium carrots chopped (1 1/2 cups)
- 1/2 medium white onion chopped (1 cup)
- 1/2 cup chopped red bell pepper
- 3 garlic cloves minced
- 1 2/3 cups chicken broth or chicken stock, or veggie broth
- 1/3 cup tamari sauce or soy sauce or coconut aminos
- 1 tablespoon unsalted butter optional
- 2 eggs optional
- 1 cup frozen peas optional
Garnish:
- chopped green onions
- chopped cilantro
- sesame seeds
Instructions
Step 1: Rinse the Rice
- Rice is very starchy, and there is excess starch on the outside of the grains, particularly white rice. If the starch is left on the rice, the result will be wet, mushy fried rice. To do this, add the rice to a colander, then run it under water for about 1 minute until the water streaming out of the colander goes from milky to clear.

Step 2: Cook the Chicken
- Cut the chicken breasts into smaller pieces. Sprinkle salt and pepper over the chicken (just a couple of pinches).
- Turn on the Saute mode on the Instant Pot by pressing the Saute Button. Heat the oil in the Instant Pot and use the saute function to quickly cook the chicken on each side (about 2-3 minutes on each side). Remove the chicken from the Instant Pot to a plate or bowl. The chicken won't be fully cooked right now.
Step 3: Saute the Veggies
- Add the chopped carrots, onion, and red bell pepper to the hot Instant Pot. Saute for 2-3 minutes, then add minced garlic and saute for another minute. Turn off the Saute Button.
Step 4: Add Liquid Ingredients
- You don't want any food stuck to the bottom of the Instant Pot. This can cause a burn notice. Add a splash of chicken broth to the pot, using a wooden spoon to scrape up any bits stuck to the bottom.
- Then add the remaining chicken broth, tamari sauce (or coconut aminos) and uncooked and rinsed rice. Give everything a stir. Then add the chicken. All ingredients should be submerged in the liquid, with chicken popping out. It's important that all the rice is submerged under the liquid.
Step 5: Pressure Cook for 8 Minutes
- Make sure the clear silicone ring that sits inside the Instant Pot lid is secure (if it's not secure, the Instant Pot will not work properly), then place the lid on the Instant Pot base and turn to lock.
- Move the knob on top (venting seal) from Venting to Sealed.
- Select the Manual Button, then use the minus button to adjust the time. Cook for 8 minutes (high pressure).
Step 6: Natural Release for 10 Minutes
- Once the cooking time is complete, the Instant Pot will beep. Allow the pressure to release naturally for 10 minutes.
- Then, use a towel or hot pad holder to release remaining pressure by turning the valve on top from Sealed to Venting. Once all the pressure has been released, open the lid.
- Fluff the fried rice with a fork. If you're not adding eggs or peas, serve immeadiately.
Step 7: Scramble the Eggs (Optional)
- If you want to make Instant Pot fried rice with eggs, make a well in the center of the fried rice by pushing the rice to the perimeter of the pot.
- Melt 1 tablespoon unsalted butter. Crack 2 eggs in a medium-size bowl. Whisk for 20-30 seconds with a fork. Then add the eggs to the melted butter.
- Let the eggs set for a few seconds, and once you see some setting on the sides, use a rubber spatula to begin moving the eggs around. Allow to set again for a few seconds, then move. Repeat this until the eggs are fully cooked (about 3 minutes).
Step 8: Fluff and Add Peas
- Stir the scramble eggs into the fried rice, then add 1 cup of frozen peas. Stir everything together and serve.
Notes
- How to Store: Store leftover rice in an air-tight container in the fridge for up to 4 days.
- How to Reheat: Reheat the rice on the stove-top with a splash of water (to keep things moist), or in the microwave.
- School Lunch: Place reheated fried rice in a thermos for a hot school lunch. See 8 more hot school lunch ideas.
- Work Lunch: If you have a microwave at work, I love glass meal prep containers for taking the fried rice to work and reheating.
After reading the directions, it seems the title is a little misleading. When one is looking for a quick dinner because they are short on time, this would not be helpful. This is more of a 45 minute dinner when you have to figure in all the prep time of cutting the veggies and chicken and the instant pot getting to pressure, cooking, then natural release for 10 minutes. I just thought I would mention that because if I saw this on a weekday thinking I’d be making a quick meal, I’d be very frustrated. However, today is Sunday and this recipe looks good and I will still try this recipe, since I’m not on a time crunch today. All your recipes thus far have been a hit with my family so I’m sure this one won’t disappoint. Thank for all your family friendly recipes!!
Hey Angie, Sorry it wasn’t fast enough for you, but I”m glad you enjoyed the recipe. Thanks for sharing!
Another hit with my family. So much flavor! This is a great quick meal for those busy week nights. Thanks for sharing.
Awesome, Janette! So glad you liked the fried rice and found it so easy to make.
This is delicious! I appreciate your generosity in sharing your recipes and I love to utilize the weekly meal plan you send via email. (Especially since I choose not to participate in any social media platform.) Thank you very much!
Hey Corinne, I’m so happy you enjoyed the fried rice! It means so much to hear that you’re loving the weekly email meal plan, too!
Kristin,
Do you turn the instant pot back to saute when adding the eggs?
Hey Y, Yes, turn the Instant Pot back to Saute when adding the butter and eggs.
I love this recipe!!! Have made it twice so far and it will definitely become a staple weeknight dinner for us. Kristin- how much is a serving size in this recipe?
Hey Lauren, About 1 1/2 cups per serving. So glad you’re enjoying the recipe!
Our family loves to make this fried rice for weekday dinners. It’s so easy and makes great leftovers! Let me know what you think.