Do you want to know how to make foaming hand soap? It’s easier than you think, and you’ll save money in the process. You only need 2 ingredients and 2 minutes, following 2 easy steps. (We’re going with the 2 theme today, because who has time for complicated natural living.)
Back in 2014, I shared a DIY liquid hand soap recipe. Today, that post has over 290 comments and is internet famous. One of the most asked questions is “How do you make foaming soap out of liquid soap?” Today, I’ll show you just how easy it is to turn a liquid soap into your very own DIY foaming hand soap!

Why make your own foaming hand soap?
If you want to ditch toxins and use natural products, the first place to start is with the products you use every single day. Make changes to the products touching your skin and circulating in your home the most often. (11 natural cleaning swaps anyone can make…)
One of the top ingredients to avoid in cleaning and skincare products is “fragrance.” This sneaky word isn’t a single ingredient; rather, “fragrance” can be made up of thousands of different chemicals, some of which are of known concern, like phthalates. What makes fragrance so tricky is that companies are not required to disclose the ingredients that make their “fragrance” due to trade secret laws. This is why you’ll only find the word “parfum” or “fragrance” listed on the ingredient list. Fragrance can be found in most store-bought hand soaps.
Another concern, particularly with hand soap is the use of triclosan. According to a release by the FDA, Antibacterial Soap, You Can Skip It, Use Plain Water, “Many liquid soaps labeled antibacterial contain triclosan, an ingredient of concern to many environmental, academic and regulatory groups. Animal studies have shown that triclosan alters the way some hormones work in the body and raises potential concerns for the effects of use in humans. We don’t yet know how triclosan affects humans and more research is needed.”
I’m going to use caution and avoid the use of commercial soaps for hand washing in our home.
An easy way to ditch toxins, like fragrance and triclosan, is to pick up a bottle of castile soap. What is castile soap?
Castile soap isn’t a new fad. It’s been around since the 11th century and was first made in the Aleppo of the Levant region (modern day Syria). The Crusaders learned about this soap which was, eventually, duplicated in Europe without success. That is, until a region in Spain (called Castile) was able to get the recipe right and successfully made what we know today as “castile soap.” The soap became popular with Spanish royalty and eventually by the 1500’s made its way to England.
Castile soap is…
- Super Versatile: Castile soap is super versatile. You can make both cleaning and body products with castile soap. Explore 7 money-saving ways to use castile soap.
- Inexpensive: You can purchase a 32-ounce bottle of castile soap for about $17. Yes, this is more expensive than a bottle of foaming hand soap, but it will last you for months and make multiple refills of foaming hand soap! Castile soap is highly concentrated so a little bit goes a long way and it’s designed to be diluted.
- Non-Toxic: Castile soap is made with easy to recognize, simple, non-toxic ingredients. This is why you can use it on your skin and home surfaces.
There are many different brands of liquid castile soap available. I personally use Dr. Bronner’s unscented castile soap for making foaming hand soap and liquid hand soap.
How do you make homemade foaming hand soap?
It’s incredibly easy to make your own foaming hand soap. If you’re new to natural cleaners and skincare products, this DIY recipe is a great place to start because it’s so easy to make and only requires 2 simple ingredients.
Foaming Hand Soap Ingredients
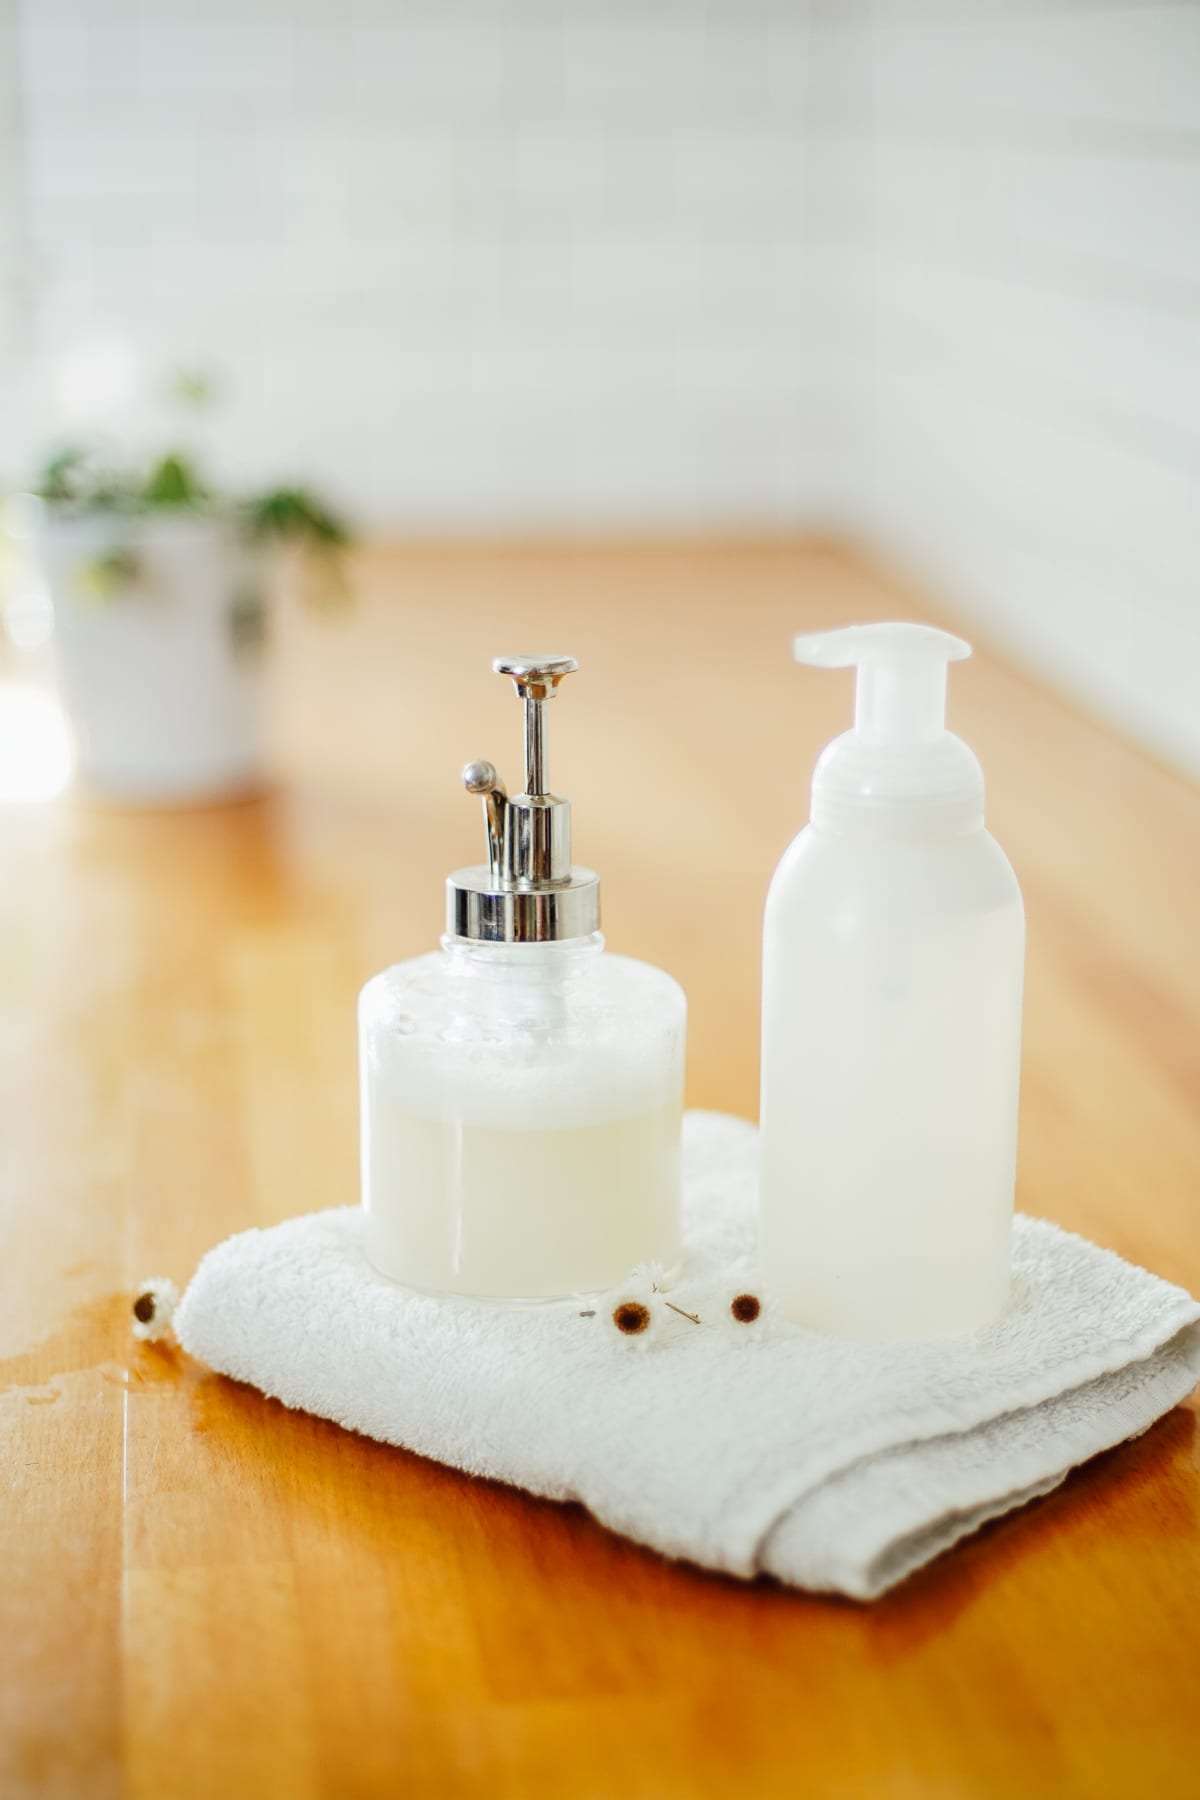
- Foaming hand soap pump container: Reuse a foaming hand soap container or purchase a new reusable foaming hand soap bottle from Amazon or your favorite home store, like this. Look for an 8 ounce, 12 ounce, or 16 ounce bottle.
- 1 cup liquid castile soap: Any scent variety. I personally use unscented.
- 1 Tablespoon nourishing carrier oil: Any kind of nourishing skincare oil: olive oil, grapeseed oil, jojoba oil, or sweet almond oil. This is optional. Castile soap can dry out hands on its own so I like to add a nourishing carrier oil for the moisturizing benefits. Stay away from virgin coconut oil (the stuff used for cooking) since it will clog a soap dispenser. Alternatively, you can use vitamin E oil or vegetable glycerin.
- Few drops of essential oil (optional): Choose your favorite essential oil, like Lavender, tea tree, peppermint, citrus, etc. if you’d like to add a natural scent that also adds beneficial cleaning properties. (Benefits of using essential oils for cleaning.)
- 1 cup water: Distilled water is best for longevity and safety. Distilled water (or water that’s been boiled for 15 minutes and cooled) removes bacteria, impurities, and contaminants. If you choose to use tap water, you’ll need to use the soap very quickly, within a week or two. For this reason, I recommend going with distilled water as the soap will safely keep for about a month.

Instructions
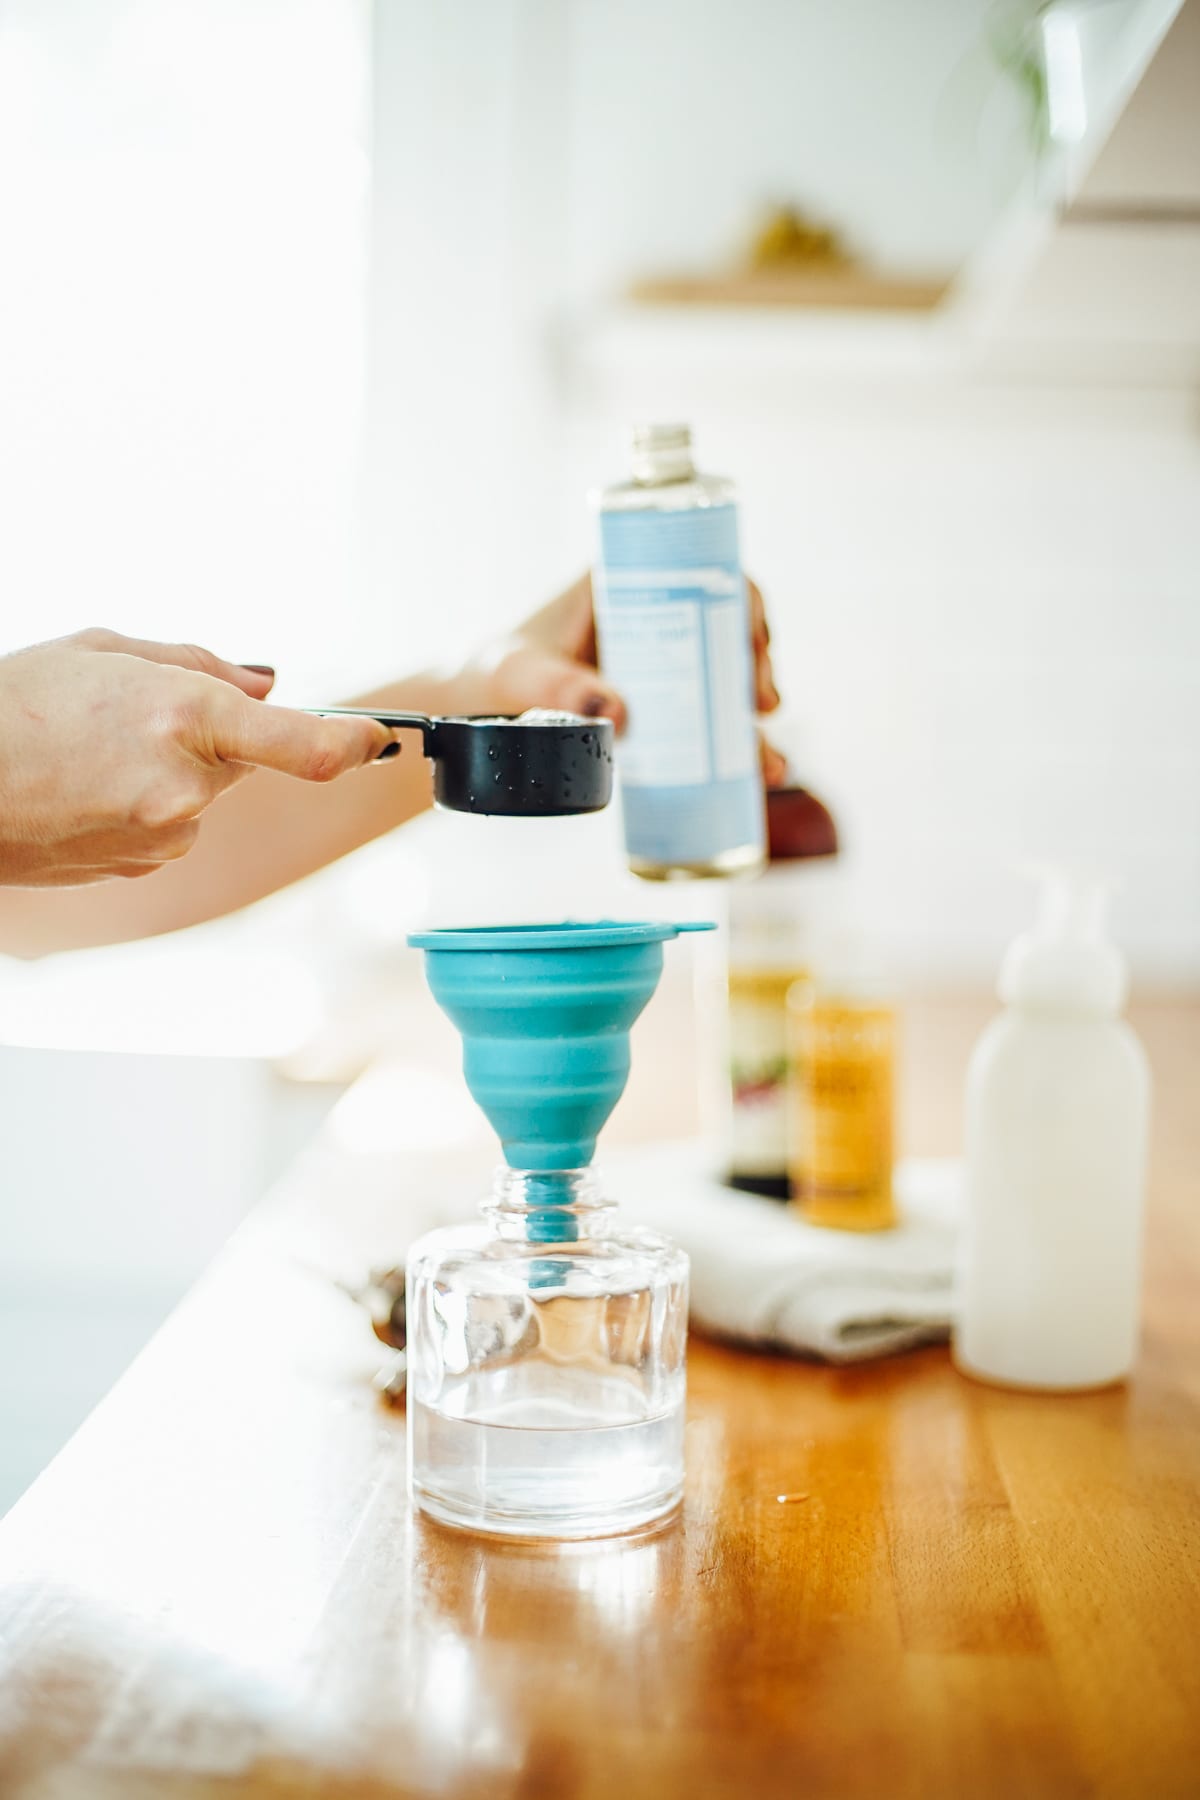
- Add water to a foaming hand soap pump, followed by the liquid castile soap, carrier oil of choice, and essential oil.
- Place the lid on the foaming hand soap bottle and shake to combine the ingredients.
- Pump the soap on your hands and lather. (Yes, this hand soap will lather thanks to the foaming hand soap dispenser!)
How do you make foaming soap out of liquid soap?
If you have a natural hand soap that you just love, but would like to convert that liquid soap to a foaming hand soap, you’ll simply need to purchase a foaming hand soap container. Add the liquid soap to the foaming hand soap dispenser and you now have your own foaming hand wash! If the soap is super thick, you may need to dilute it with water.
What makes foaming soap foam?
If you’ve read my post on how to make hand soap, you’ll notice the ingredients are the same. The only difference between liquid hand soap and foaming hand soap is the bottled used to dispense the soap.
The soap container is what takes a liquid soap to foaming and even increases the lather for a natural hand soap like castile soap. You can also make DIY foaming body wash using liquid castile soap and a foaming soap dispenser container.

Favorite refillable foaming hand soap bottles:
- Mason Jar Glass Dispenser: If you love the mason jar look and you’re looking for a glass bottle, this is the best option. Try this 16-ounce dispenser with labels or this 16-ounce dispenser.
- Plastic Dispenser: If you have kids using this hand soap in the bathroom or kitchen, a plastic container may work best. Try this 12-ounce dispenser or this 8-ounce dispenser. I’ve seen people drop a couple of Lego pieces at the bottom of the container for a fun “kid touch.”
- Mason Jar Foaming Dispenser Tops: If you have extra mason jars sitting in your pantry, turn one of those mason jars into a soap dispenser by adding a foaming top like this.
DIY Foaming Hand Soap
Ingredients
- 1 cup water distilled water is the best
- 1 cup liquid castile soap any variety of castile soap, scented or unscented
- 1 TB olive oil almond oil, grapeseed oil, vegetable glycerin, or jojoba oil (optional)
- essential oil (optional for scent), just a few drops of your favorite essential oil: lavender, citrus, peppermint, etc.
Special Equipment
Instructions
- To a foaming soap dispenser, add the water first (to prevent bubbles) then the liquid castile soap followed by the oil. Shake the ingredients together.
- Shake the soap dispenser before using, then squirt a small amount on your hands as needed, rinsing with water.
- If you use distilled water, the soap will last at least a month. If you use tap water, use quickly within a week or two.
Notes
What type of soap dispenser should you use?
A foaming soap dispenser must be used. You can refill an old foaming hand soap dispenser, like a Mrs. Meyers bottle, or buy a new bottle off Amazon or a home store. Either option works, just be sure it's a foaming soap dispenser. My favorite foaming hand soap dispensers:- Mason Jar Glass Dispenser: If you love the mason jar look and you're looking for a glass bottle, this is the best option. Try this 16-ounce dispenser with labels or this 16-ounce dispenser.
- Plastic Dispenser: If you have kids using this hand soap, a plastic container may work best for you. Try this 12-ounce dispenser or this 8-ounce dispenser.
Thank you for the printable recipe! Quick question, when you say “If you use distilled water, the soap will last at least a month”, what do you mean by “last”? Do you mean the fragrance from oils (i.e. the fragrance will break down eventually), or something else? Thanks.
It stays safe and fresh to use without a high risk of bacterial growth or spoilage. Tap water can introduce impurities and bacteria more quickly, so the mixture needs to be used up faster (within a week or two). Distilled water helps extend that safe window to about a month or longer in many cases, especially if stored in a cool spot. It’s not primarily about the fragrance fading (though essential oils can naturally weaken over time), but more about overall safety and quality since this is a water-based recipe without commercial preservatives.
I’m about to try this and have a question about essential oils. There are so many out there and I’ve heard that some are not pure therefore fake ingredients added. What brand do you suggest/ use? I’m in Canada by the way! Thanks:)
Hi Marta, thanks for your question and for trying the DIY foaming hand soap recipe! You’re absolutely right to be cautious about essential oil purity—some brands do add synthetic fillers, which can be irritating and less effective. Since you’re in Canada, here are my favorite brands for 100% pure. I love Saje and Vitruvi for their Canadian roots and accessibility, but Plant Therapy or Eden’s Garden are fantastic for value. Look for “100% pure essential oil” on the label with the botanical name (e.g., Lavandula angustifolia for lavender) and avoid anything labeled “fragrance oil.” You can find these at Amazon.ca, Well.ca, or health stores like The Big Carrot. For the soap, start with 10–15 drops of lavender, lemon, or tea tree for a fresh scent, and store the bottle in a cool spot to keep it fresh for a few weeks. Let me know how your soap turns out or if you need help picking oils—happy crafting!
[email protected]
I will try this . Have a couple of questions.
Have you tried adding aloe vera gel?
Also do you think hydrocele water would work.
I extract oils from herbs ,such as lavender, spearmint and sage. I use the hydocel water in cleaners.
Would you mind sending me an email on your thoughts?
Hey Linda, Yes, you can use hydrocele water; that would be lovely! I haven’t tried aloe vera gel, but I think it would be lovely.
This works fantastic!
Hi Kristin, do you have to shake up the soap dispenser bottle before every use so it mixes together again, or is it just the one time when you first make it?
Thanks 🙂
Occasionally shake as needed. It’s usually not every time, just occasionally.
LS Team
An anything else be used instead of water so it becomes long life?
Distilled water. You could use a hydrosol, too. But even at that, I wouldn’t stretch it longer than 6 weeks. I’m just on the cautious side
LS Team
Hi Kristin. Like Sue, I also use a 3 to 1 on the soap and water but then adding in the oil. I have found that a 50/50 clogs up my foaming dispenser. But love making my own hand soap and other cleaners. Thanks for all you do to inform us.
That’s cool, you can do that. I say do what works for you.
LS Team
Hi Kristin, I use Dr. Bronner’s but I don’t do 50/50 . I use about 75 water/25 soap and it turns out great.
Love your blog!!